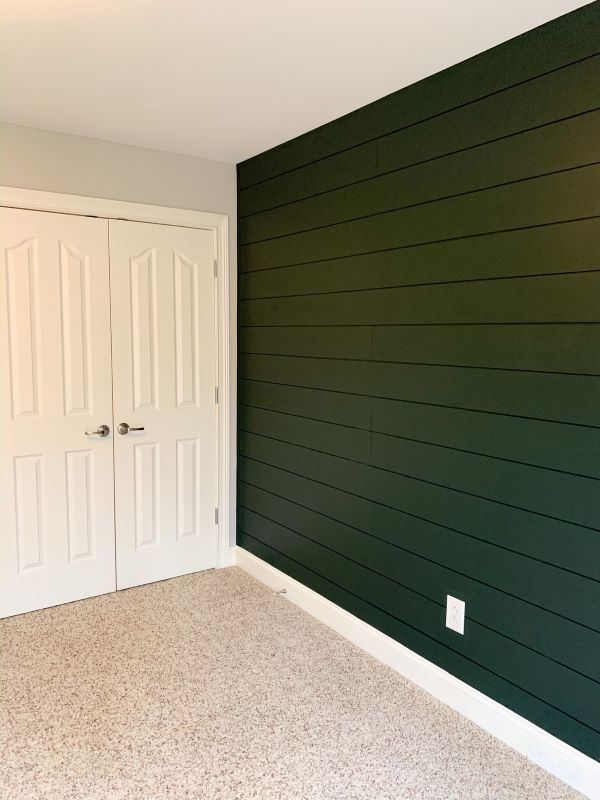
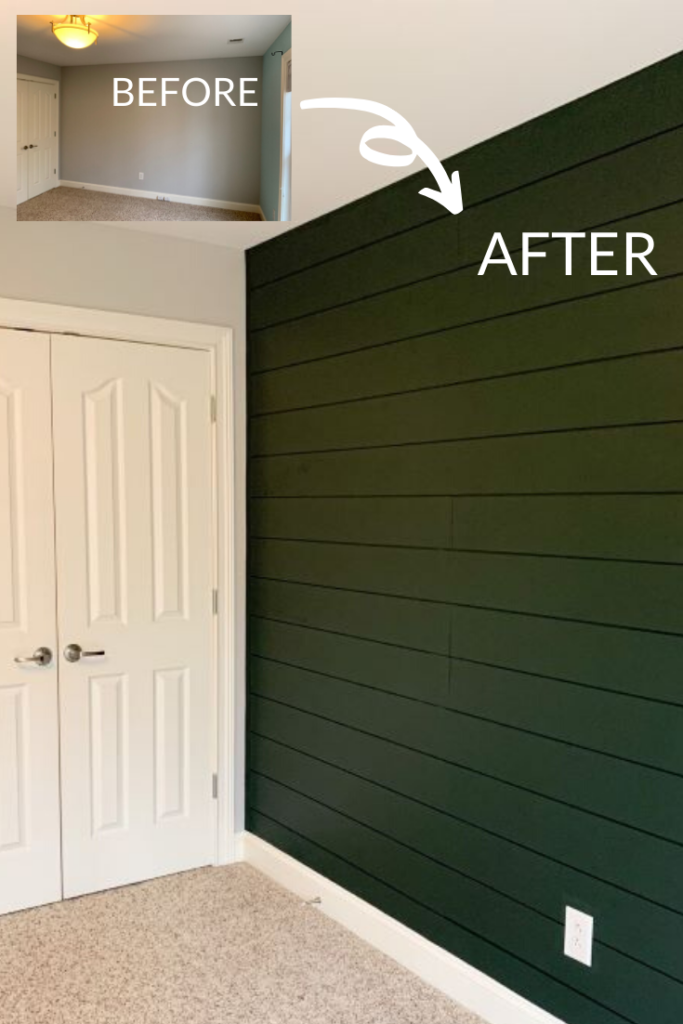
I am not ashamed to admit it – I am a total Joanna Gaines fan-girl… so naturally, I love the look of shiplap and had to learn how to plank a wall for our nursery! Mike and I are expecting our first baby boy in March, and I kept envisioning the same focal wall for his space – a dark green, shiplap wall!
Together, Mike and I tacked our DIY shiplap wall and it turned out awesome! I’m so happy it came out exactly as I had pictured. This guide is all about HOW to plank a wall for a faux-shiplap look and will walk you through the steps to take based on the process we used.
For the purposes of this tutorial, I do use shiplap and planks interchangeably, but our wall is truly a plank wall made to resemble a tongue-and-groove shiplap.
As an Amazon Associate, I earn from qualifying purchases. This post contains affiliate links.
How to Plank a Wall FAQs:
Before I jump into our step-by-step process on how to plank a wall, here are some commonly asked questions that might help you if you are considering a DIY shiplap wall.
How much does it cost to plank/shiplap a wall?
The cost to plank or faux shiplap a wall can vary depending on the size of your wall and the materials you choose. For instance, our roughly 12×8 wall cost us about $150.00 total with shiplap materials and paint. For some perspective, a finished, tongue-and-groove shiplap like this would have cost us nearly $400.00.
Can I make my own planks/shiplap?
Yes! This guide will walk through the steps on how to plank a wall or create your own faux-shiplap wall by cutting down boards to the plank size you want.
What material do you use for plank/shiplap walls?
There are many material options you can use to plank a wall. You could choose MDF, underlayment, plywood, tongue and groove shiplap, etc. All the materials we used for our wall are listed below for you to reference and easily copy.
Do you put planks/shiplap over drywall?
Yes – you can put your planks directly over drywall with little-to-no-prep needed.
Do the planks need to be glued to the wall?
No – your planks do not need to be glued to your wall if you use a nail gun and nail the boards into studs. We chose not to glue our planks to our wall to limit the mess and materials, and we wanted the option to remove the shiplap in the future without destroying the drywall underneath.
Do you start planking your wall from the top or bottom?
You can start your planks from either the top or the bottom of your wall. We chose to go top to bottom for a few reasons: 1. Our ceiling was level, whereas our floor had some variation. 2. We wanted a full board on top because this would be more visible. 3. Doing a half board on the bottom let us make adjustments based on the floor variation and would be partially covered by the nursery furniture – AKA less noticeable.
How to Plank a Wall Step-by-Step Process:
Below are the materials, tools, and exact process we took to achieve our plank wall or DIY shiplap.
Materials:
- (4) ¼” sanded pine plywood 4×8 sheets
- Spacers (Scrap ¼” plywood pieces)
- 180 grit sanding block
- 220 grit sanding block
- Tack cloth
- Painter’s putty
- 1.5” brad nails
- Electrical box extender(s)
- Painter’s tape
- Pencil
- Paint
Tools:
Step 1: Determine how many sheets of plywood you need
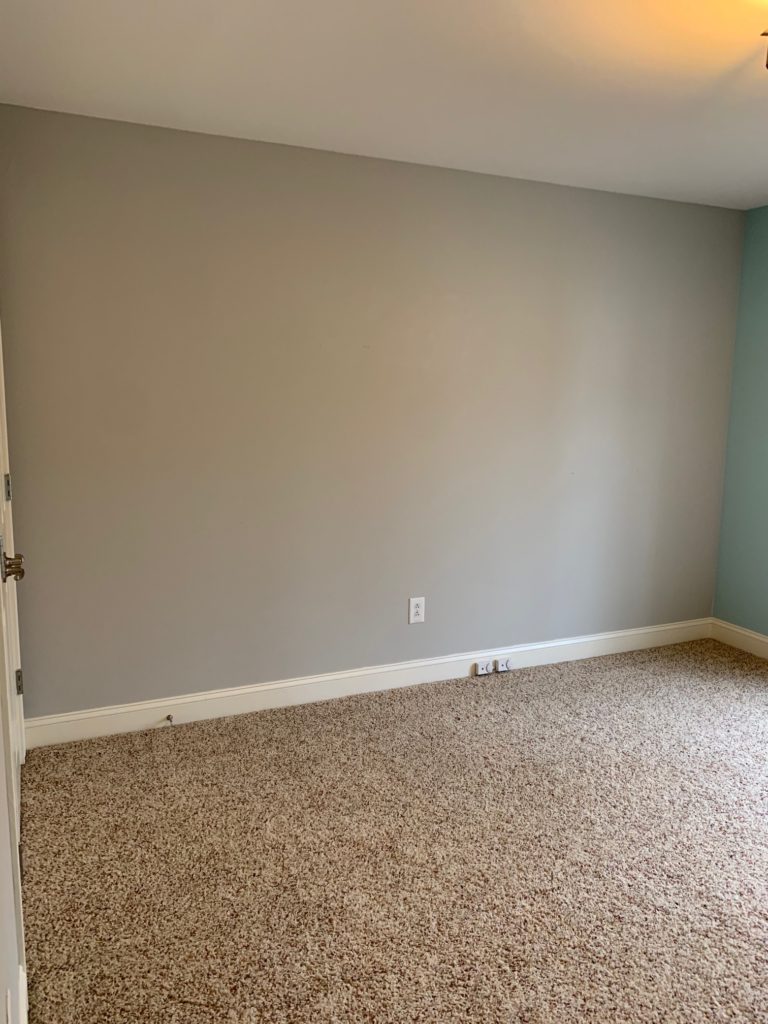
Measure the height and width of your wall to determine how many boards you will need. Our wall width was 12 ft 3 inches. With our baseboards still attached, our height was 7 ft 7 inches. We decided to leave our baseboards on and use the natural ledge to hold our boards. You can remove them and plank to the floor if you’d like.
Plywood boards come in 4 ft x 8 ft sheets. Knowing this, we decided we would run 8 ft and 4 ft planks across our wall to equal 12 feet total. This made it easy as we only had to cut down some of our 8 ft boards in half. To account for the extra 3 inches width of our wall (12 ft 3 in total) we decided to make two 1.5-inch trim boards, one for each side of the wall. Additionally, we decided to do 6-inch-wide boards, so we needed a total of 4 plywood sheets to complete our plank wall.
Step 2: Select your plank material
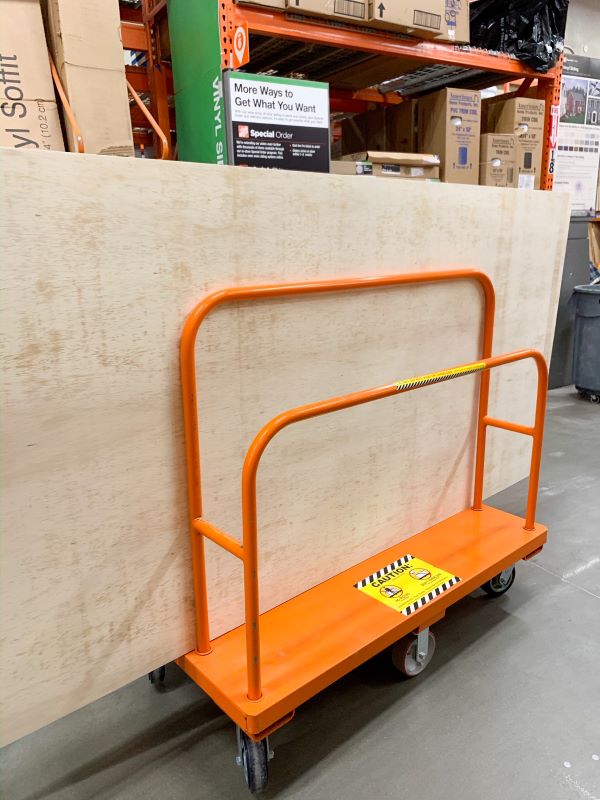
We chose a ¼ inch sanded pine plywood at $22.00 per sheet from Home Depot. At four sheets, our total was $88.00 in material costs. We decided on this because it would cut down on our overall sanding and it was sturdier than underlayment.
Step 3: Rip your material down to the desired plank size
You have a few options when it comes to this step in how to plank a wall. You can go the total DIY route, use the expertise and tools from a store like Home Depot, or a combination of these options!
Cutting Option 1: Use your personal table saw
If you have a table saw, you can do the cutting by yourself. You can easily set your measurements to the appropriate size and make your cuts at home.
Cutting Option 2: Use a home improvement store’s cutting machine
Since we don’t have a table saw, we had the Home Depot associate help us rip down the boards to 6-inch-wide pieces. The guy told us they normally don’t do cuts below 12 inches because it can be harder to get a straight line. But, we asked if he would try to cut one to see how it turned out, and it measured evenly across the whole board at 6 inches! WINNING. He ripped down all our boards, leaving us with the last piece from each at 12 inches because it was below his guard.
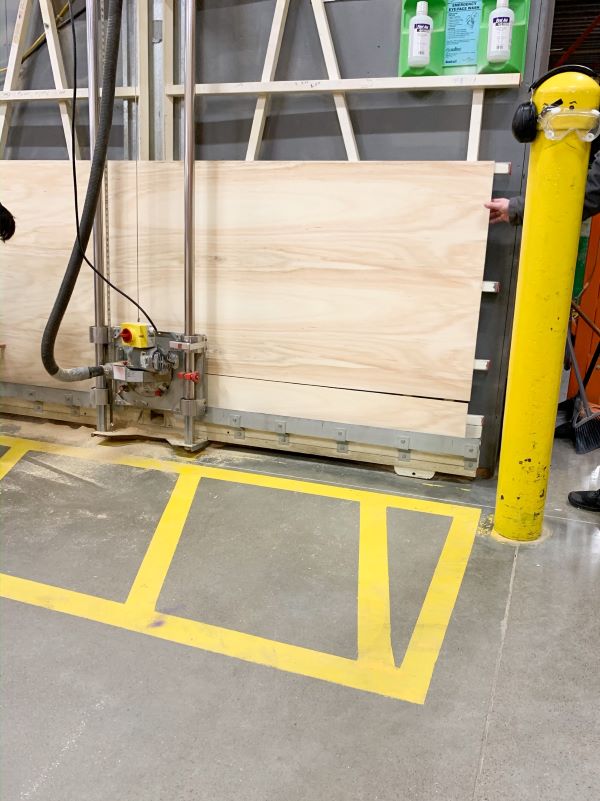
In total, he did roughly 16 cuts and we were charged a whopping $4.00. Totally worth it, especially if you don’t have a table saw like us. This left us with only having to cut down our half boards at 4ft, two trim pieces, and the last board which was under 6” on our own.
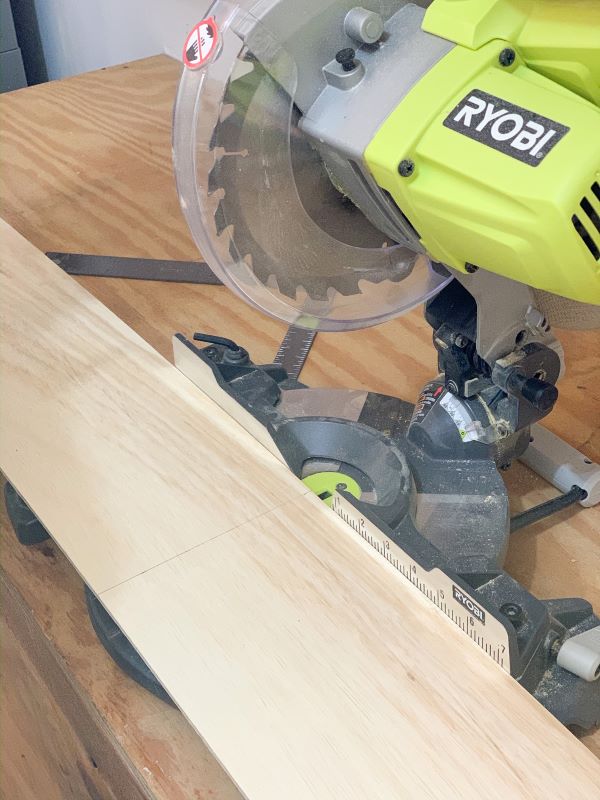
To cut our half boards, we measured 4 feet and made a line on our boards. We used our miter saw to cut these down.
(Keep reading for how we cut down our trim and last board)
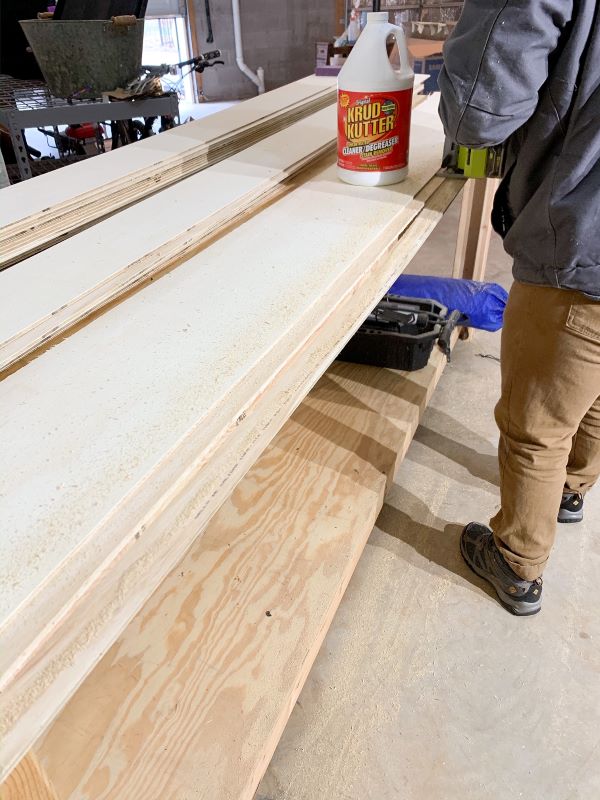
Cutting Option 3: Create a cutting area using a guide board, clamps, and a circular saw.
For our trim pieces and our very last plank, we used this method. First, Mike put down the board we were going to cut down onto the workbench, hanging off slightly. Then, he found the straight edge on one of the plywood boards we had and used this as a guide for our circular saw. He set this straight board on top of the first piece.
Next, he measured 1.5 inches on the bottom board to account for the trim piece we needed. He also had to add 1 inch to this for the circular saw guard rail. He checked the entire run of the board with a carpenter square and confirmed it was even across the whole board.
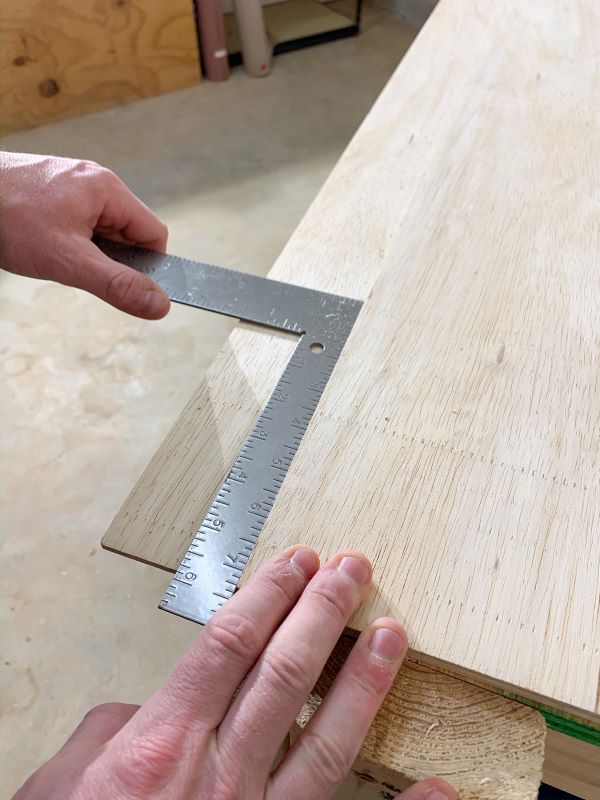
Next, he tightened the clamps on either end, and we placed a few weights on the guide board (aka krud kutter – my favorite cleaner for furniture prep). Taking the circular saw he began cutting the board, making sure the saw remained flush to the guide board. I helped hold the cut end of the board as he moved so it wouldn’t snap as he went.
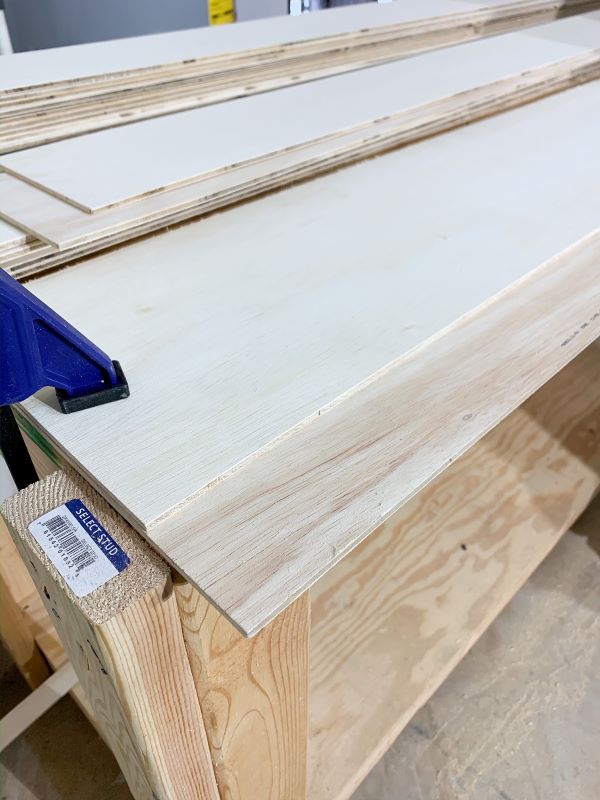
Step 4: Sand your planks
Once you have all of your planks cut down to size, you will want to sand down the edges and the front side you intend to paint. We used a 180-grit sanding block for the edges. Since we chose sanded plywood, the front side didn’t require much sanding. Just to be sure we had an even surface for paint, we took a 220-grit sanding block to the fronts.
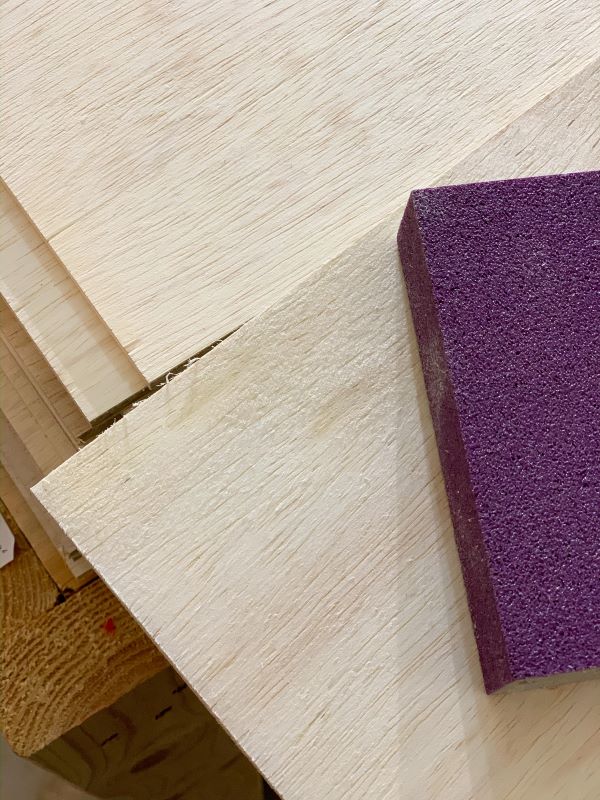
If your edges or boards are rougher than ours, or if you are doing a larger wall or space, you might opt for an orbital sander to speed up this process. With a sanding block, it took us under an hour (this included Mike doing our 4ft cuts and trim pieces while I sanded the boards).
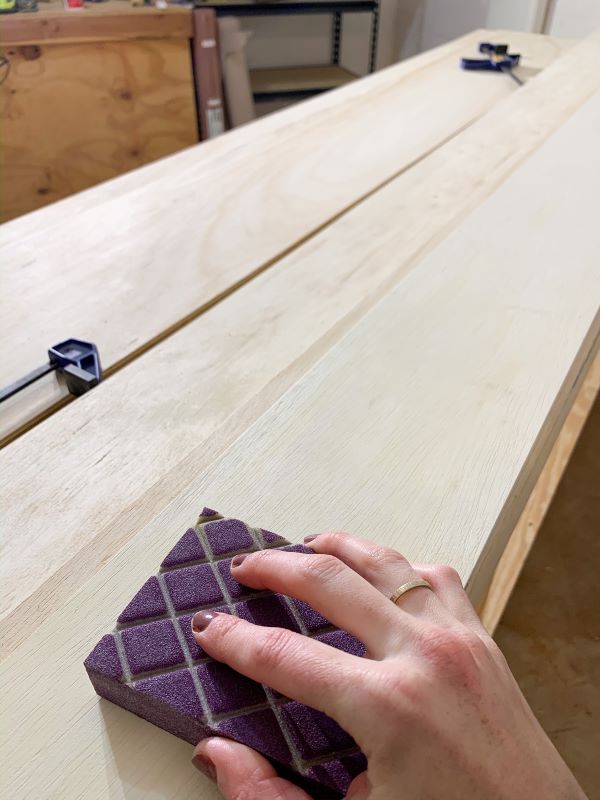
Try to blow or wipe off as much sanding dust as possible before bringing the planks into your room. You can use a shop blower or tack cloths for this which will help reduce the dust/debris you bring in. It will also keep your boards clean for paint.
Step 5: Mark the studs on your wall
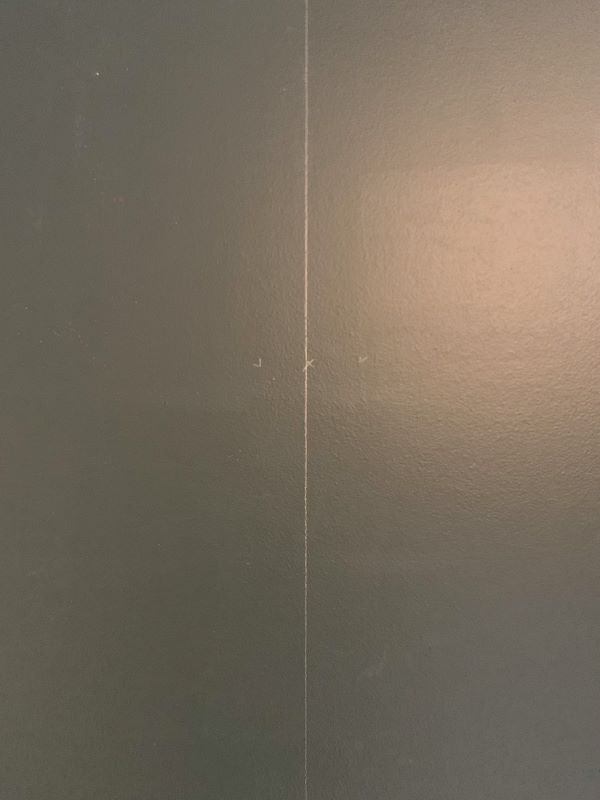
Grab a stud finder and find the first stud on your wall. Take your pencil and make an X at this point.
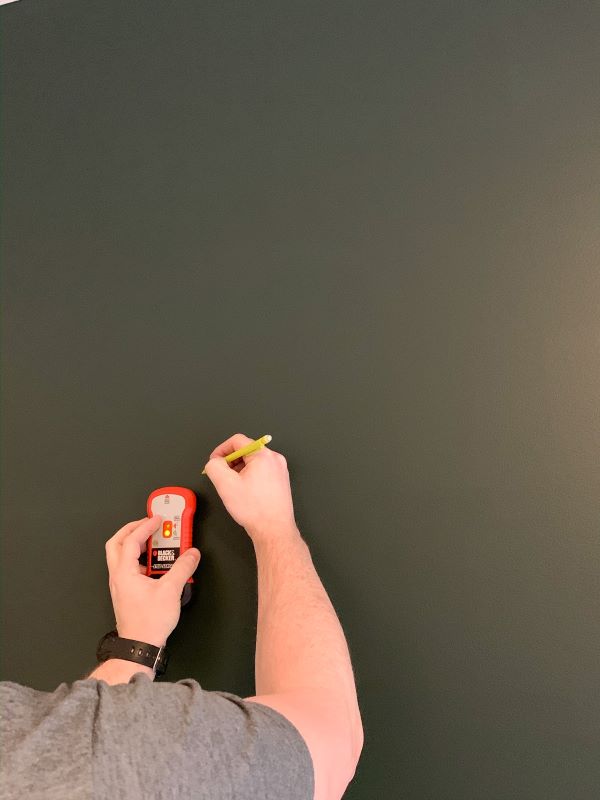
Next, you will want to take a straight board or long level and make a vertical line from ceiling to floor where your studs are located.
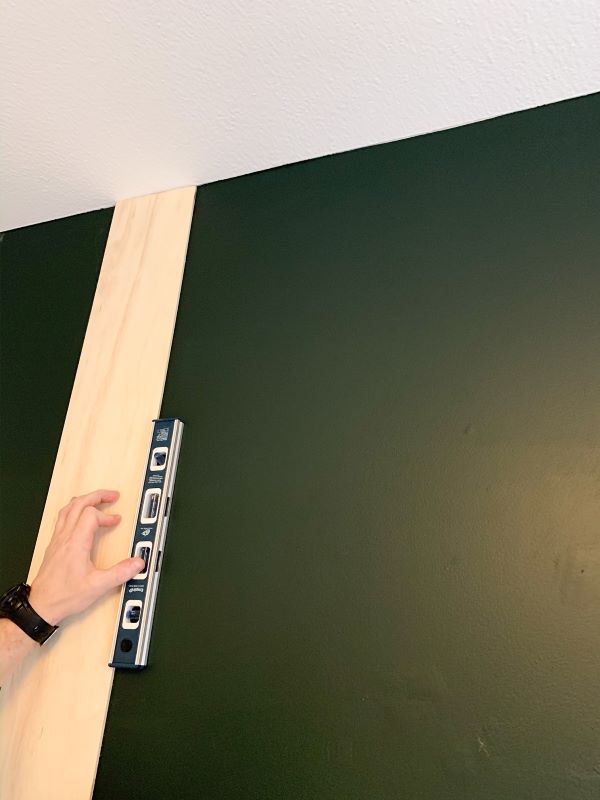
We found our first 3 studs and confirmed they were exactly 16 inches apart, so we expedited this step by simply measuring every 16” with our tape measure and making our marks. These marks and the lines you make will be where you nail your planks, so they are securely attached.
Step 6: Attach trim boards
If you are adding trim boards to the sides like us, we attached these first. We made sure they were flush to the ceiling and rested on the baseboards, and that they were tight to the adjacent wall.
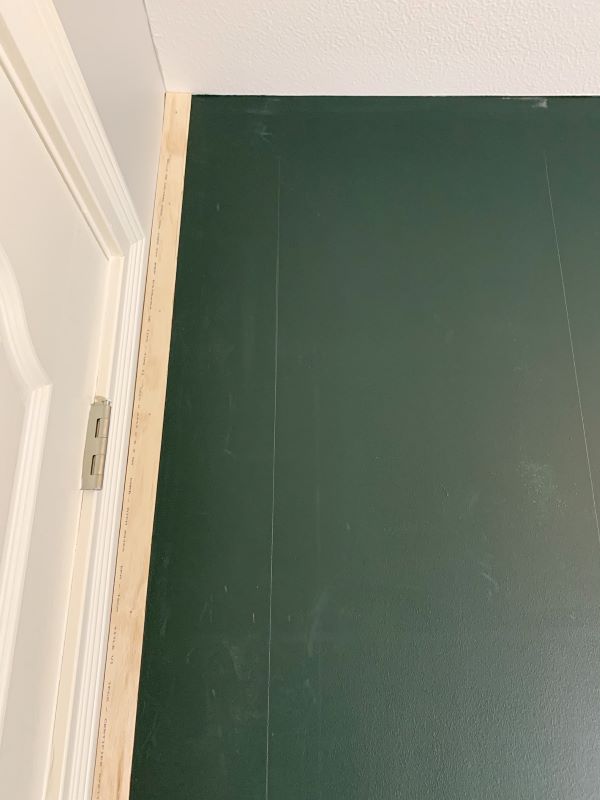
Once in position, I helped hold the board while Mike took the nail gun and attached the board about every 6 inches. We repeated this process on the other side of the wall.
Step 7: Begin attaching your planks to the wall
Choose your starting position and first board size:
We started from the ceiling down and worked left to right, then right to left (like a snake pattern). We decided to attach an 8-foot board first.
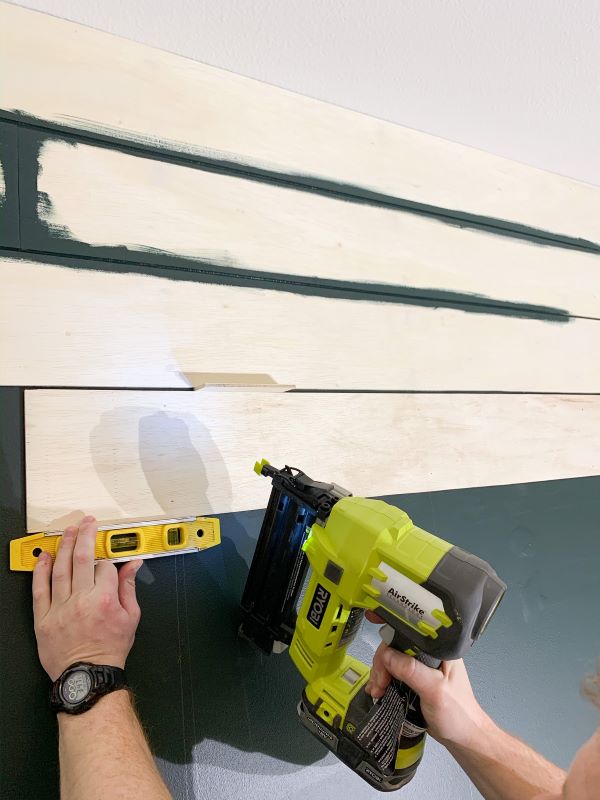
Check your planks are level:
The first board is super important because it sets the stage for every plank after that. So, it is important to make sure it is level! To do this, Mike and I both stood on stools, holding the 8-foot plank and a level. We positioned the plank so it was tight to the left trim piece and the ceiling. While holding it with one hand, we each positioned our levels below the plank on opposite sides to check the position. We both were level!
Nail your planks to the wall:
Once you ensure your plank is level, take your brad nail gun and nail the plank into your studs. We did two nails per stud, one higher and one lower. Don’t be afraid to nail in where it is just drywall to make sure your planks are flush at the ends. We did this for a few planks where they met and bowed slightly.
Attach your next board size:
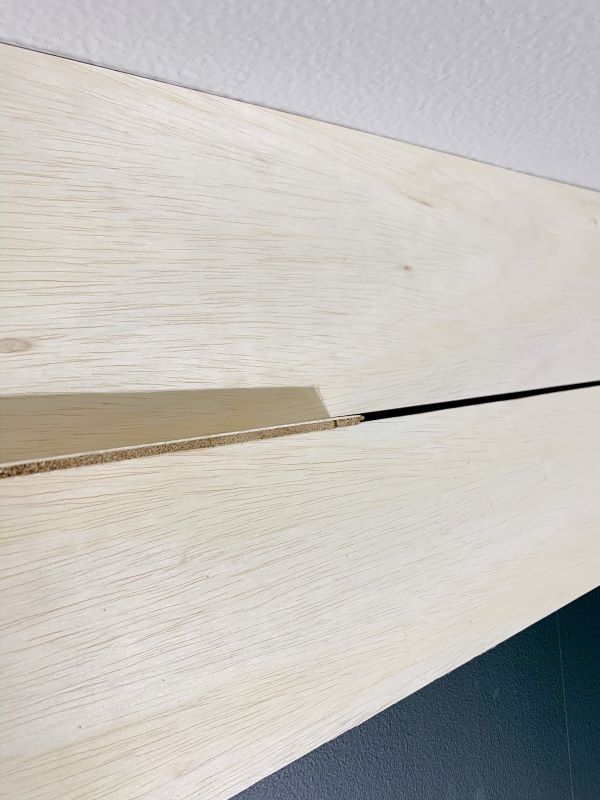
Next, you will attach your 4-foot plank. This is where your work so far is put to the test. If your planks are slightly off (like ours were) you might have to re-measure the space left on the wall and re-cut your planks accordingly. With the smallest variance in our trim board width, and how tight we could get our planks to the edge, we needed to cut ours down a little to make it fit.
Once cut down correctly, attach the plank next to your first making sure it is flush to the ceiling and wall, and checking it is level. Attach using the same process above. Then, you will start on the right side under this board and attach your next 8-foot plank.
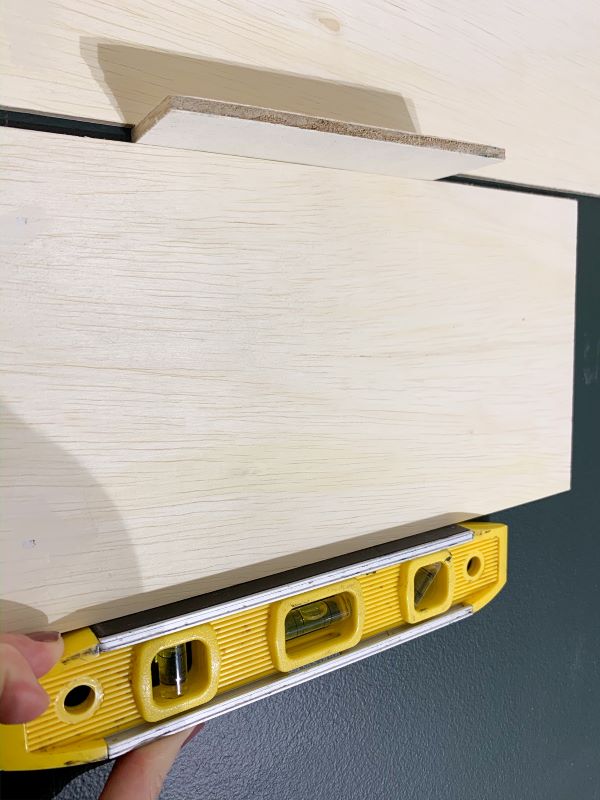
Choose your spacer size:
You will need to decide what spacing you want your planks to have. Many people use nickels or quarters, but we wanted ours to be easier to hold, and bigger to create depth. We used scrap pieces from our plywood, so our spacers were ¼ inches thick.
Position your desired spacers between the two planks, ensuring the spacing is tight and even. With your spacers in place, check to make sure the plank is level. Then, attach it with your nail gun. That my friends is the main gist and the process you will continue to follow on your whole wall. Not too bad, right?
Cut around outlets:
The one added layer is how you go about adding planks around outlets. First, remove your outlet covers if you haven’t already. Next, take your tape measure and mark where your outlets are on your board. Once you have the outlet outlined on your board, you can use a jig saw to cut out the outlet hole. (Don’t forget to account for your spacer if it falls in this space!)
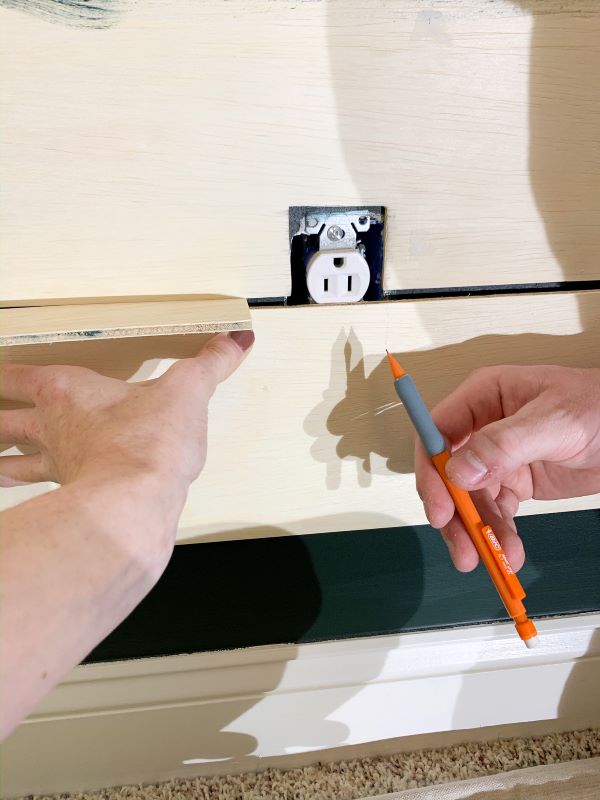
Install your electrical box extender(s):
Next, install your electrical box extender into your existing electrical box. This lets your outlet remain flush to the wall once you install your plank over it.
Step 8: Putty plank nail holes
While Mike did the new half cuts, I started on our next step of applying painter’s putty to the nail holes in tandem with us hanging the rest of the plank wall. You can follow this process or complete hanging all your planks beforehand. Do what makes sense for you!
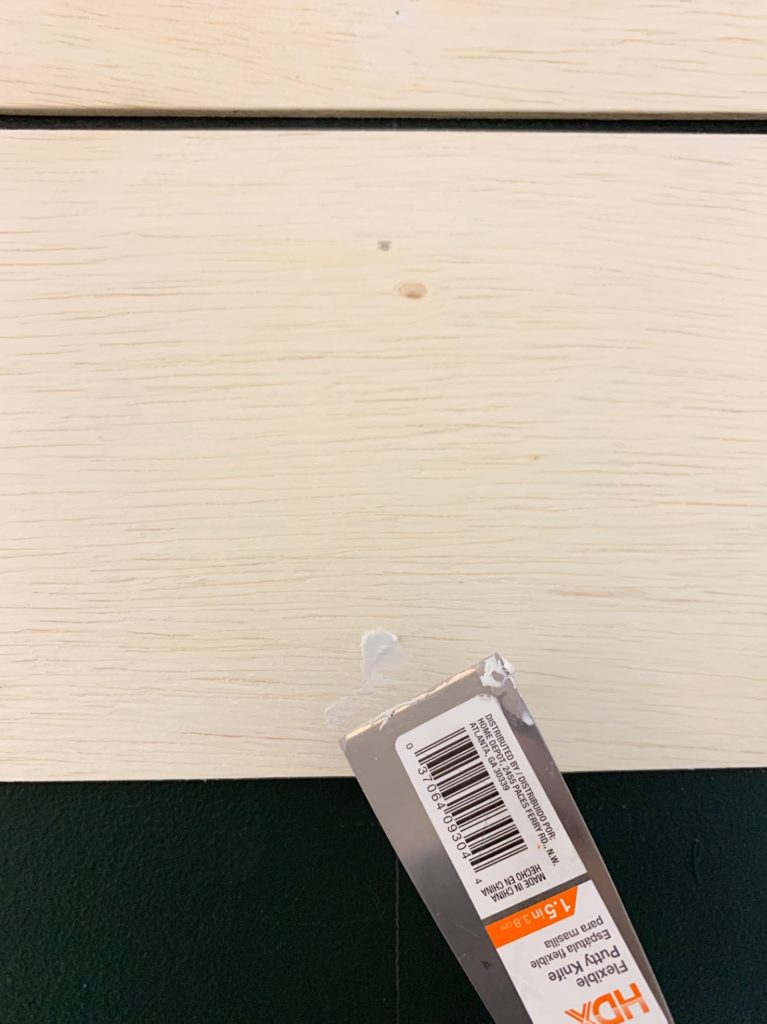
Using a putty knife, apply a small dab of painter’s putty to each nail hole and smooth it flush. Remove any excess putty. Let the putty dry according to the recommended dry time – ours was 24 hours.
Step 9: Paint the edges of your planks
To paint the edges of your planks, you’ll want to use a small paintbrush. I used a 1” paintbrush for ours. Depending on your spacing size, you may opt for something smaller.
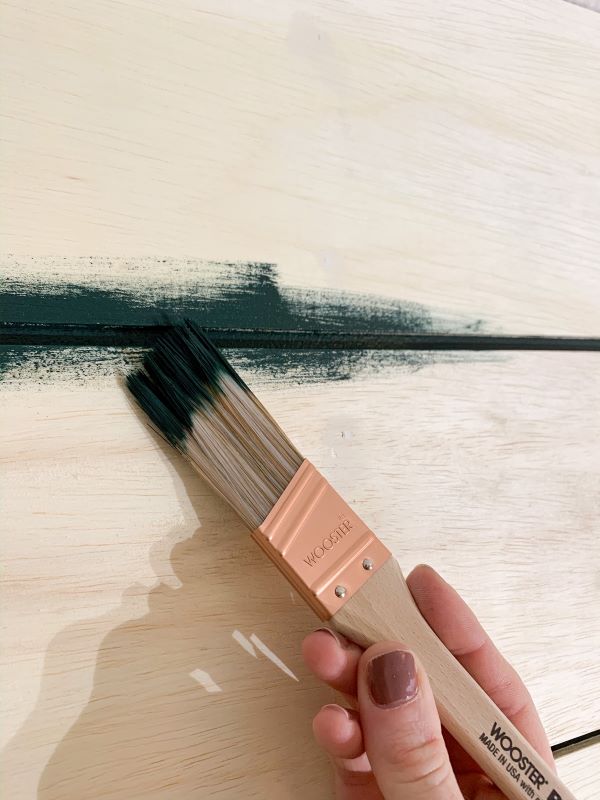
It can be a little tough to get into the tight space with paint. I made sure to look from the top and the bottom of the planks to make sure I got full coverage. It took me about a coat and a half to cover it completely.
I also painted our wall prior to us planking it but you wouldn’t have to. If you don’t, you may need to do multiple coats to cover the paint color that comes through your spacing.
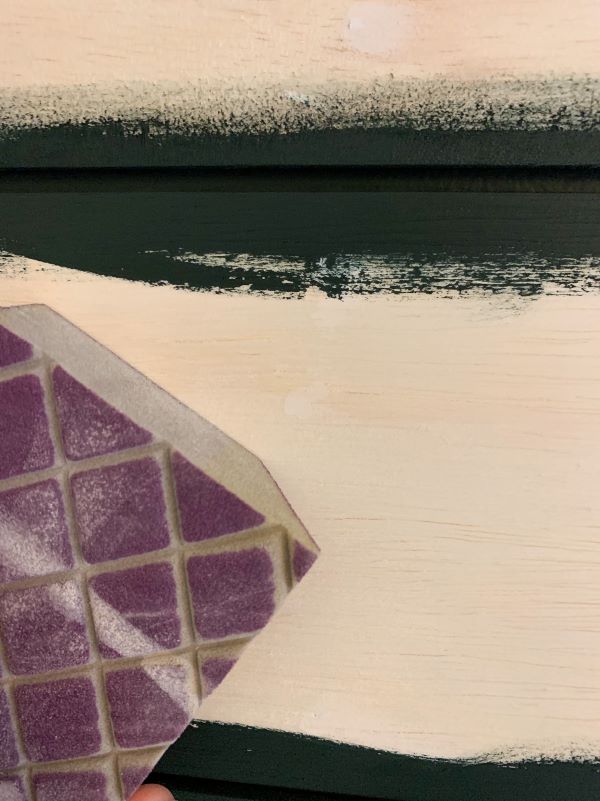
Step 10: Sand down your painter’s putty
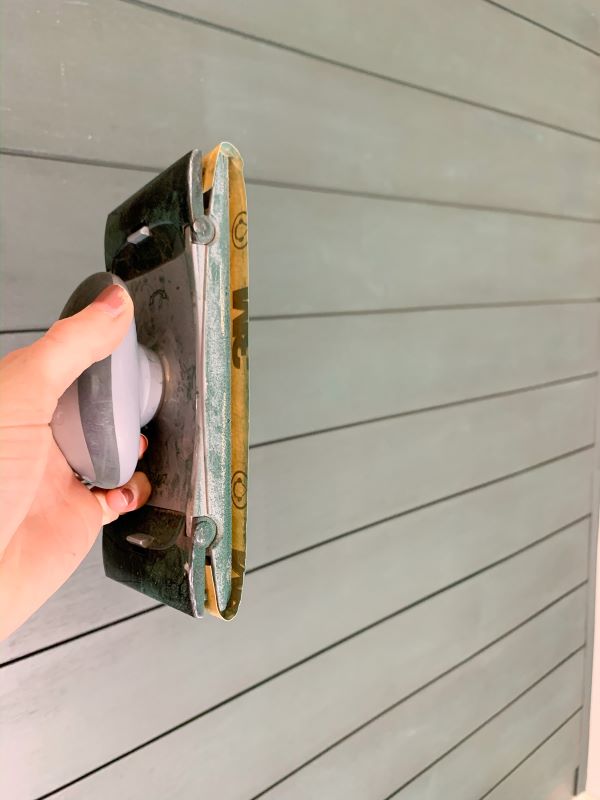
Once your putty has dried the recommended time, take your 180-220 grit sanding block and sand the excess putty smooth. After sanding, use a tack cloth to remove the sanding dust.
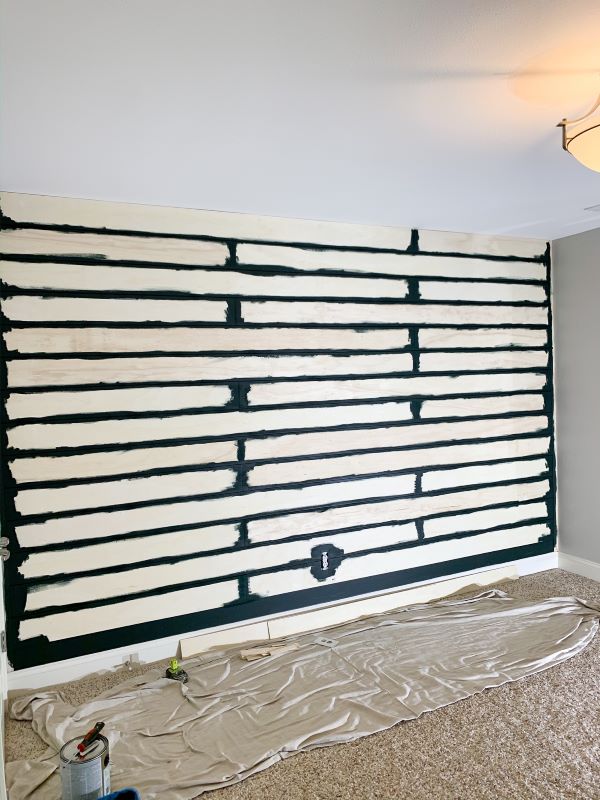
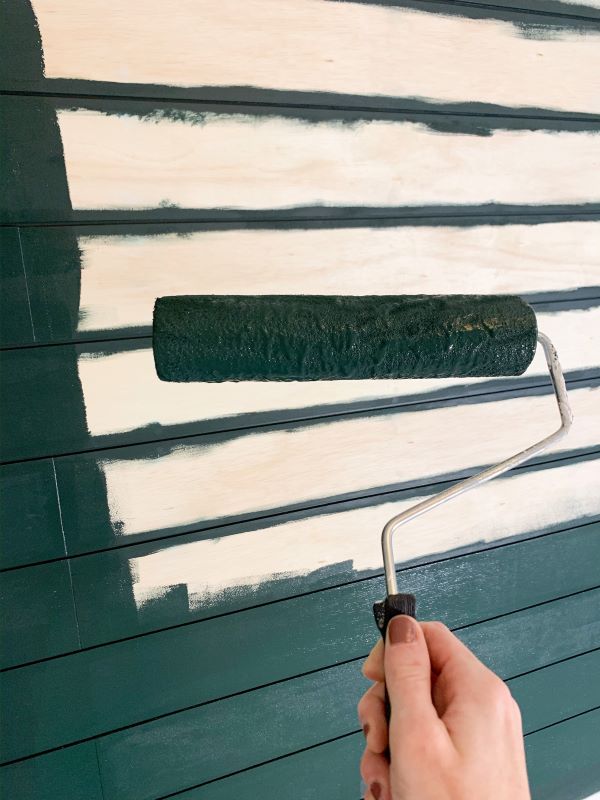
Step 11: Tape off your wall and paint your planks
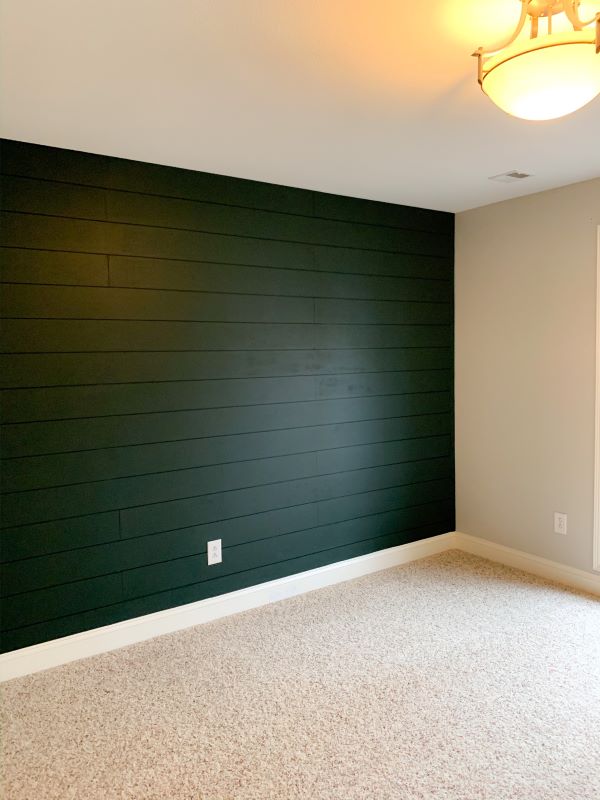
Tape off your shiplap from your surrounding walls and ceiling with frog tape. After this is done, grab a paint roller and apply your paint horizontally with the planks. We used Sherwin Williams Jasper which is a dark green, and chose an eggshell sheen.
Step 12: Sand in between paint coats if your planks are rough
Paint can expand the wood, making it rough in certain spots after it dries. We decided to sand our whole wall down with 400-grit sandpaper to smooth out a few rough spots. After sanding, you will want to remove the sanding dust with a tack cloth and paint a second coat.
Step 13: Step back and marvel!
That’s it! Adding a plank wall or faux-shiplap wall adds a ton of character and interest to a space! I am so happy with how ours turned out for our little guy. It’s so fun to think about this being in his room as he grows up until who knows when!
I hope this guide on how to plank a wall helps you create a fun focal wall for yourself! The cost and outcome are really worth it if you are willing to put in a little time! I have a feeling this won’t be our last shiplap wall.
Any questions on the process we used to plank our wall? Have you done a plank wall before? Tell us in the comments!
Thanks & happy shiplapping!
Ps. stay tuned for a full nursery reveal coming soon!
Meg
Looking for more tutorials?
If you want to learn more step-by-step processes to up your furniture game, then add these favorites to your list:
-How to replace and move furniture hardware
-Learn how to prep your furniture for paint!
-Repair furniture using bondo filler
Want more furniture inspiration and refinishing tips? Subscribe to my newsletter and follow along on Facebook, Pinterest, and Instagram for the latest updates!
How to Plank a Wall (DIY Shiplap)
Follow these steps to learn how to plank a wall in your house for a fixer-upper feel!
Materials
Tools
Instructions
Notes
The total process will vary from space to space depending on your wall size, outlets to cut around, angles of your ceiling etc. Take your time to measure and cut your planks appropriately. Adjust the recommended steps as needed.


SaraFebruary 3, 2020 11:26 pm
WOW, I am so obsessed with how the wall turned out! When we (finally) buy a house, I can’t wait to do this in my baby’s nursery!!
Megan DeLongFebruary 3, 2020 11:33 pm
Thanks, Sara!!! I am a little obsessed myself! I can’t wait until you guys own your own and get to make all the fun updates!