I am SO excited to have been a part of such a fun collaboration between The Chippy Barn and Redesign with Prima and share this guide on how to do a furniture transfer!
This dresser was the first piece I’ve ever done a transfer on and I LOVE it! Because this was my first time using a transfer, I wanted to give you my first-hand experience as a transfer newbie, and show you how easy it really is to totally transform furniture with a transfer!

First, I have to give a huge shoutout to The Chippy Barn and Redesign with Prima for graciously sending me the products to complete this project! It was also such a huge honor to be among the other talented artists who participated! You can see everyone’s pieces on The Chippy Barn and Redesign with Prima’s Instagram accounts!
As an Amazon Associate, I earn from qualifying purchases. This post contains affiliate links.
Here are the products I used for my dresser:
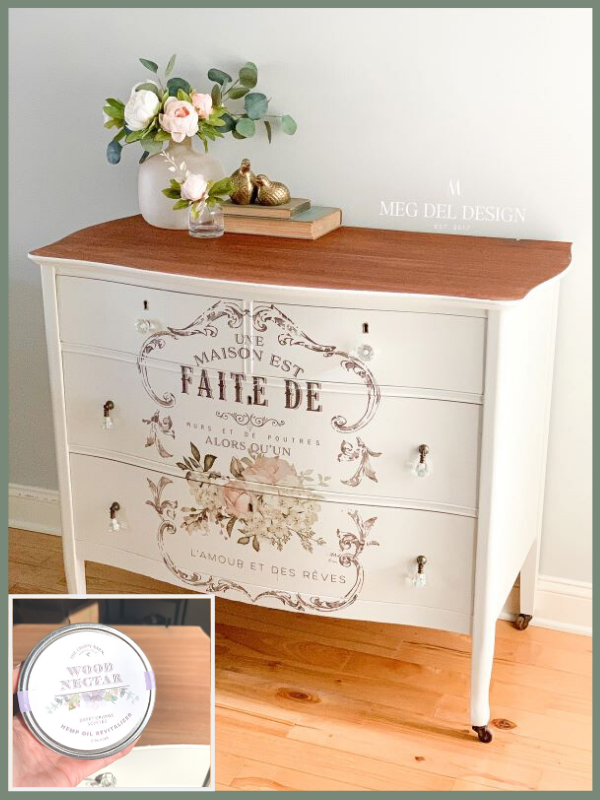
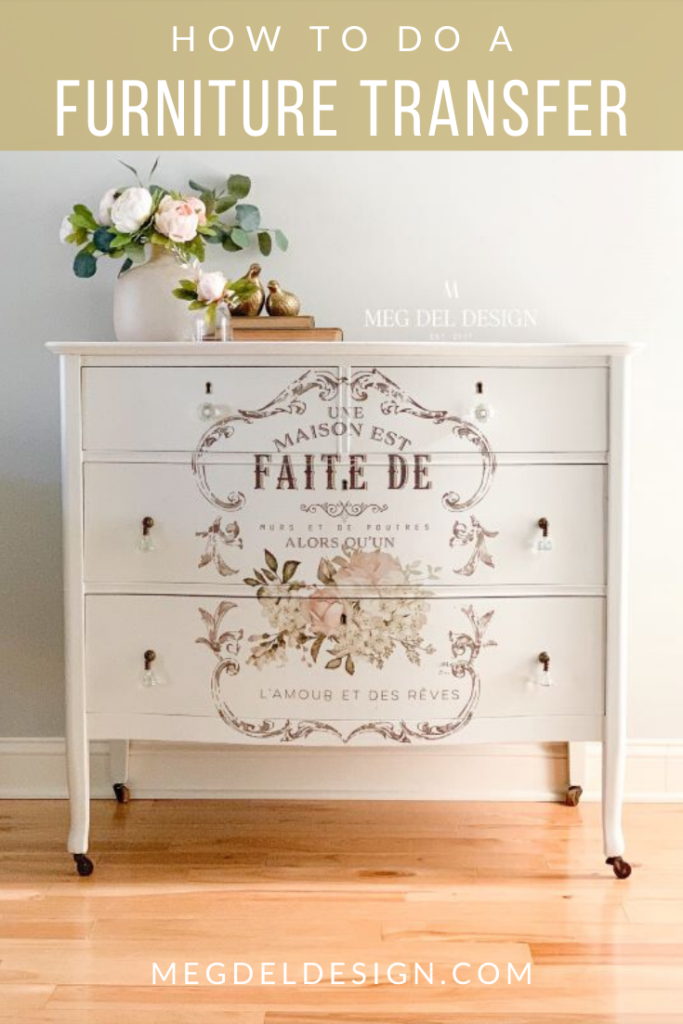
Paint: Cottage White by The Chippy Barn
Wax: Lavender Scented Wax by The Chippy Barn
Hemp Oil: Wood Nectar by The Chippy Barn
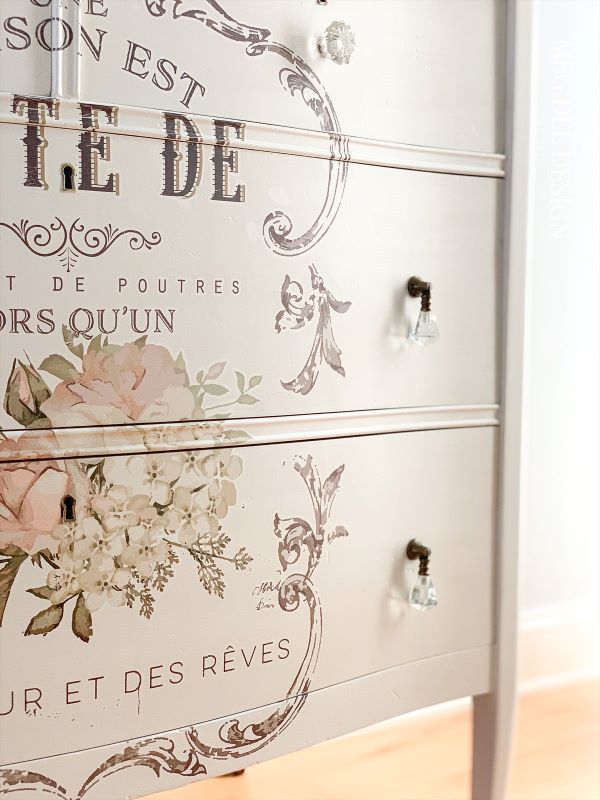
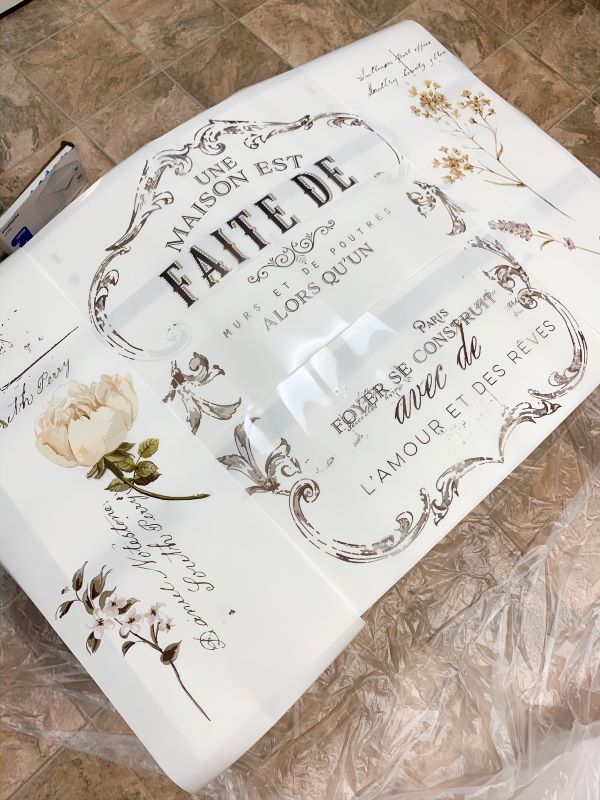
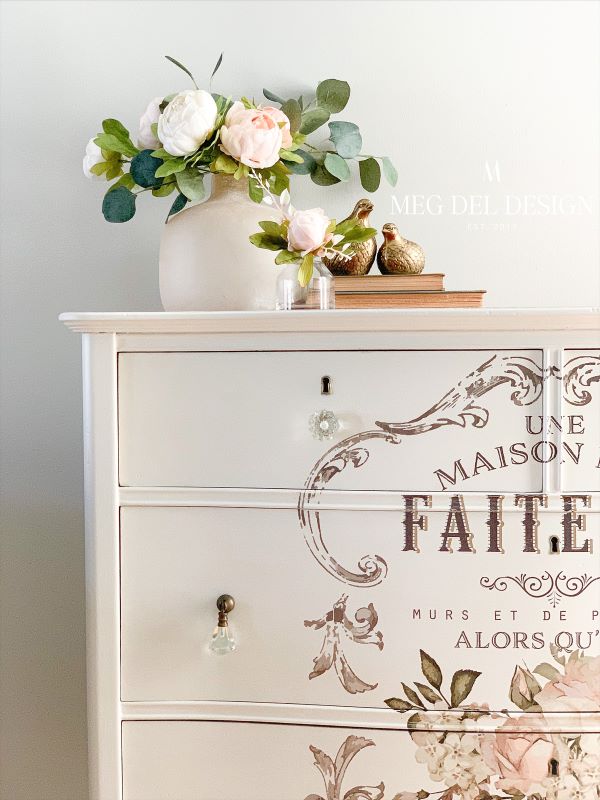
Transfer: L’AMOUR ET DES REVES by Redesign with Prima

Redesign with Prima also sent me a second transfer and a 3D stencil with medium and roller! I will definitely be using them for a project soon! (I will be sure to do a blog post on this tool because I haven’t done a 3D stencil either!)
How to do a furniture transfer FAQs:
Why use a furniture transfer?
A furniture transfer is a fantastic option for adding beautifully intricate patterns, designs, text, etc. to a piece of furniture. They can make for a stunning design element!
AND, they aren’t just limited to furniture! Transfers can be used on walls, doors, signs, and plenty of other surfaces too. This tutorial is specific to furniture but they make for incredible DIY projects of all kinds!
What is a furniture transfer?
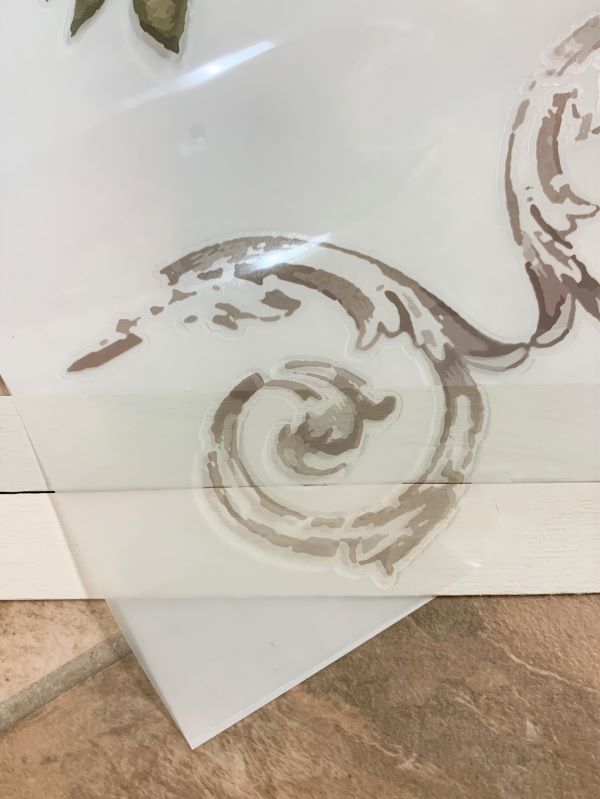
Think of a furniture transfer as a beautiful, long-lasting sticker that you rub onto your furniture piece to transfer the image. Each transfer will have three pieces that make it up. 1. The protective sheet on the bottom 2. The transfer with its adhesive backing in the middle 3. The acetate protector sheet on top.
How does a furniture transfer work?
A furniture transfer works due to the adhesive nature of the backside of the image. It is covered by the protective sheet until you are ready to place your transfer. When you remove the backing and rub the wooden stick over the acetate protector sheet on top, the image will begin to transfer to your piece.
It can require decent pressure before the design is fully transferred and adheres. You can check your progress by lifting the acetate sheet up slightly. If you still have some bits that haven’t adhered, just lay the sheet back down and continue rubbing.
*I will go into this in greater detail, in my how to do a furniture transfer step-by-step process below!
Do you have to paint before you apply your furniture transfer?
You can apply a furniture transfer over wood for a gorgeous effect. However, if you are planning to paint your piece of furniture, you will need to paint your piece first. Regardless of the look you choose for your base, it is key that your piece is clean and free of debris or dust before applying your transfer.
How long after you paint should you wait to apply your furniture transfer?
For proper adhesion, it is recommended you wait 48 hours to 1 week after painting your furniture piece to apply your transfer. Waiting the recommended timeframe before applying your transfer will give your painted piece proper time to cure.
Do you have to seal your piece before you apply your furniture transfer?
No, it is recommended you apply your furniture transfer and then apply your topcoat. Your furniture transfer will not stick to a waxed or oily finish.
Can you move a furniture transfer once it is stuck down?
If you haven’t pressed the furniture transfer down much, you may have the ability to reposition it. If you have pressed the transfer down to the point where it is sticking to your furniture piece, it is not likely you will be able to pull it up without losing some of the transfer.
How do you position your furniture transfer?
Positioning your furniture transfer before removing the backing is really important to ensure you have the placement you want. In order to position the furniture transfer, take a few pieces of frog or masking tape and play around with your placement until you find a position you like. Stick down your tape to hold the transfer into position.
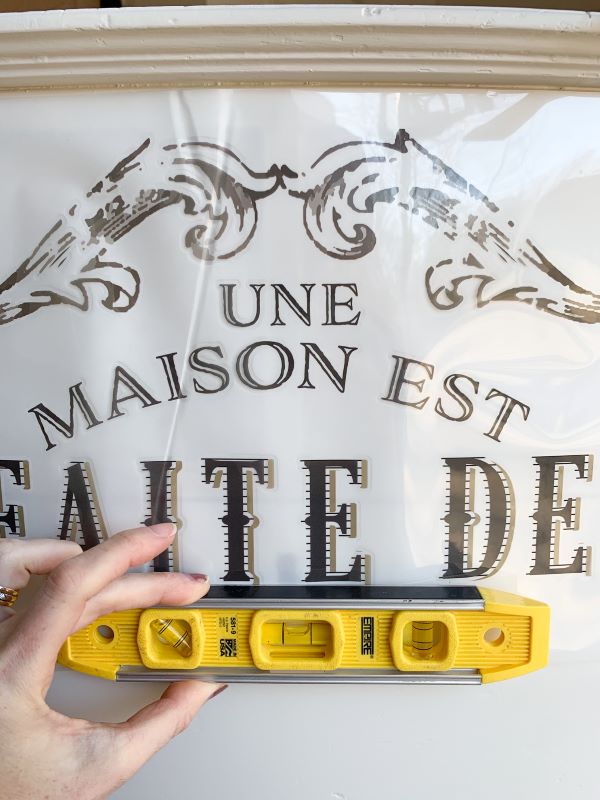
Then, take a tape measure and level if necessary, to check the position of your transfer. This can be helpful especially if you want to have it centered on your piece. Make adjustments as needed.
What if your furniture transfer isn’t sticking completely?
It takes a decent amount of elbow grease and pressure for the transfer to adhere completely. You can check your progress by lifting up on the top sheet. If there are pieces that haven’t transferred fully, lay it back down and continue rubbing.
What do you seal your furniture transfer with?
You can use several topcoats to seal a furniture transfer. Water-based top coats like polyurethane or wax work well. Avoid using harsh, solvent-based sealers.
Do you have to use the whole furniture transfer?
No – this is the fun part! You can cut down your transfers, rearrange them, use what you love from the design, and save the rest for another project. You can control what parts of the transfer you want, where you want them placed, and more!
Simple Step-By-Step Guide How to do a Furniture Transfer:
Now that you have some transfer knowledge under your belt, let’s get into it! Below is the exact process I took for my dresser and will walk you through how to do a furniture transfer!
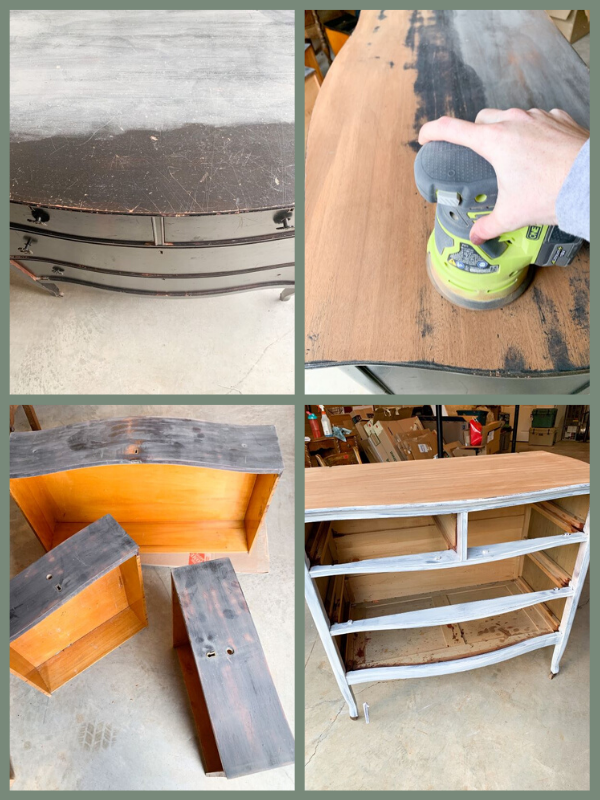
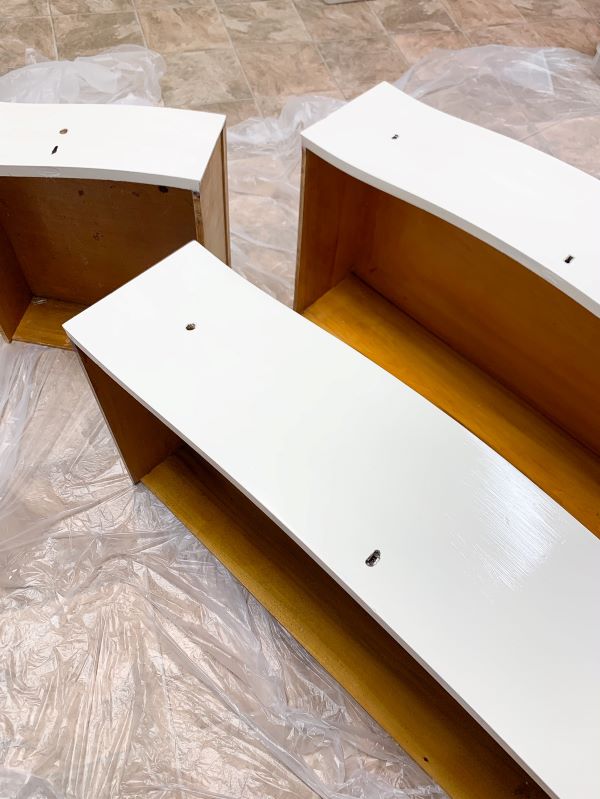
Step 1: Prepare your piece for paint or the furniture transfer
I have a complete guide on how to prep your piece for paint which will walk you through this step! It covers how to clean, repair, sand your pieces, and more. If you are doing a transfer over bare wood, you will still want to ensure your piece is prepped and clean.
Step 2: Pick your color(s) and paint your piece of furniture
Pick your paint color:
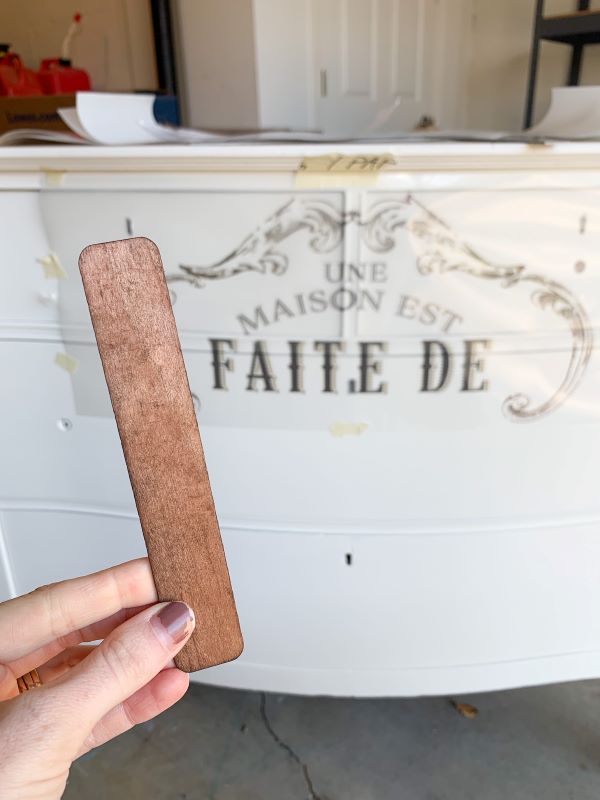
Picking a color can be tough because it isn’t the easiest to envision what your transfer will look like over the top. I made samples of 6 different Chippy Barn colors to choose from. Then, I carefully placed my sample sticks under the transfer, avoiding the adhesive side, to get a better idea of what the transfer would look like over each.
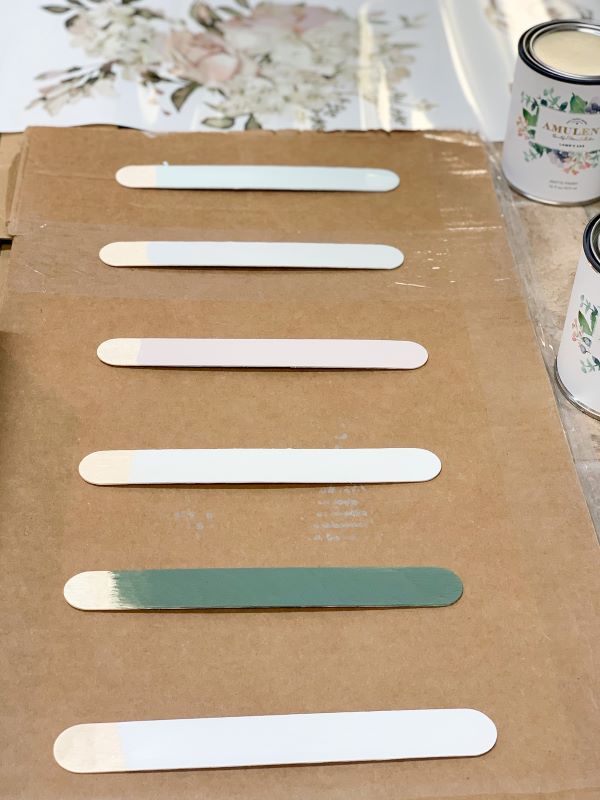
Cottage white was so perfectly warm and cozy, for that antique white I wanted. Not yellow, not too stark – the perfect white! This color was curated by Katie Cloud and it is a part of The Chippy Barn’s Beautiful Home Collection! (Get it quick – the collection is only available until April 30, 2020)
Paint your piece:
Paint your piece of furniture as you normally would. If you are like me and love to paint by hand, I highly recommend using my favorite Zibra paintbrushes. I used my fan brush for this piece!
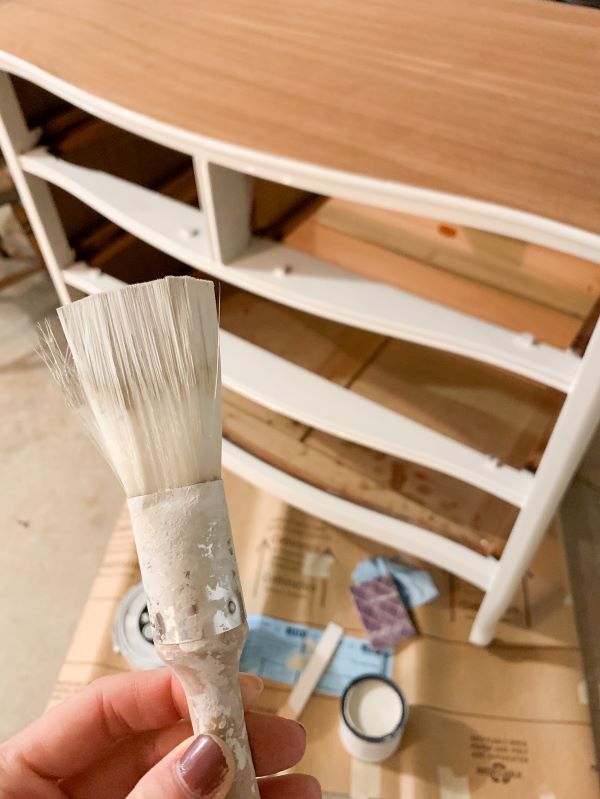
It glided perfectly over the contours of the legs while giving me a super smooth finish on the sides. If you want to use a sprayer – this is the one I have and love. You can check out all my other favorite refinisher items in my refinisher’s gift guide.
Step 3: Let your painted piece dry
Follow the recommended dry times for both your paint and the furniture transfer. This was 2-4 hours for my paint and 48 hours to 1 week for the transfer. I waited the minimum of 48 hours after my piece was dry before applying my transfer and it worked great!
Step 4: Position your furniture transfer
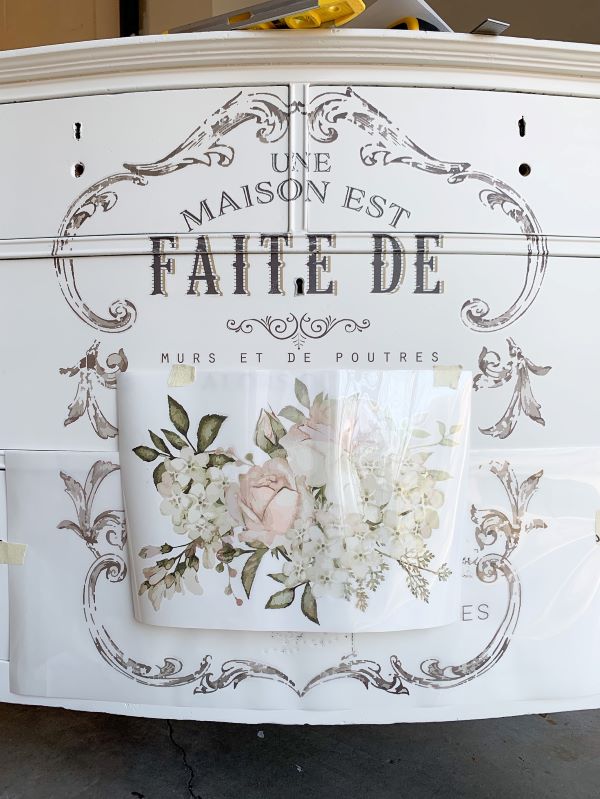
Depending on how big your transfer is, it may come in multiple small sections. You may choose to tape them all at once or piece by piece, as I did.
I also decided I wanted mine centered on my piece. To do this, I taped the top and sides of my first section and played with the position. Once I found a spot I felt was relatively centered, I stuck my tape down to hold it in place. Next, I took my tape measure to check how centered it actually was. I measured both sides from the outside of the drawer to symmetrical design points and shifted it as needed.
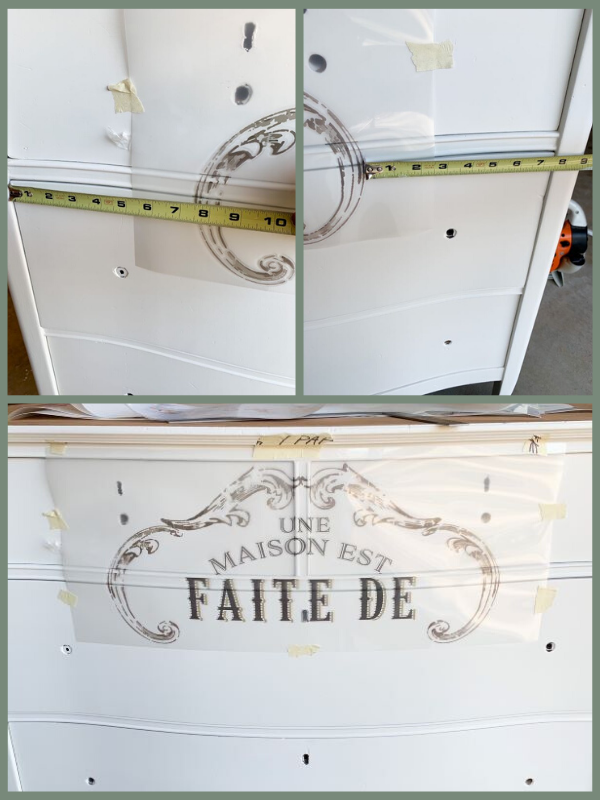
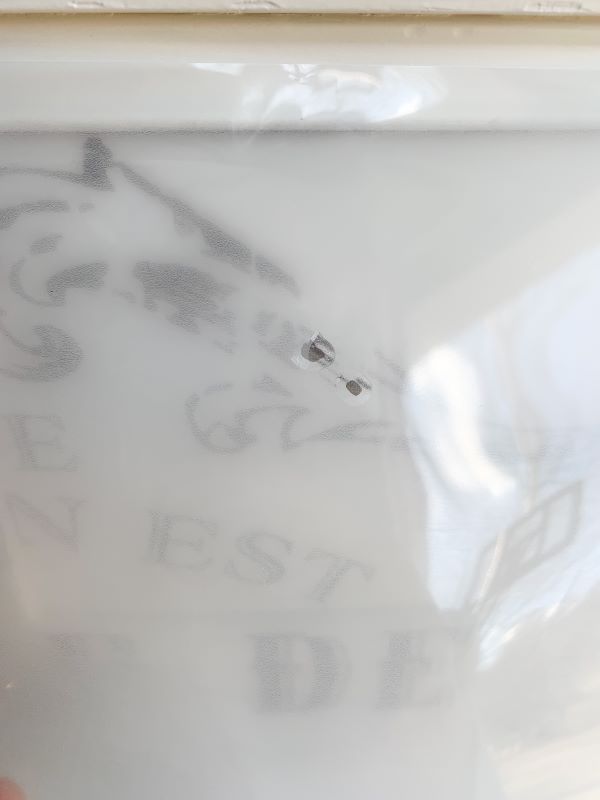
NOTE: your piece or drawer may not be 100% even, so you might have to make adjustments based on what visually looks best. For instance, I had one piece of the transfer where the design lined up under the keyhole but was too far to one side when it was measured perfectly centered. The fact that it didn’t line up under the keyhole was driving me nuts! So instead, I adjusted the transfer to be centered with the keyhole which I found more visually appealing.
Step 5: Remove your backing
Once you have your transfer where you want it and it is held tightly to the piece with your tape, slowly begin to remove the protective backing from the underside. I found this step to be the most tricky. To make it easier, I took my time removing this piece slowly, while keeping my tape in place. Additionally, I tried to make sure I gently let my transfer down with the backing removed. Doing this let me control where I started to press it down.
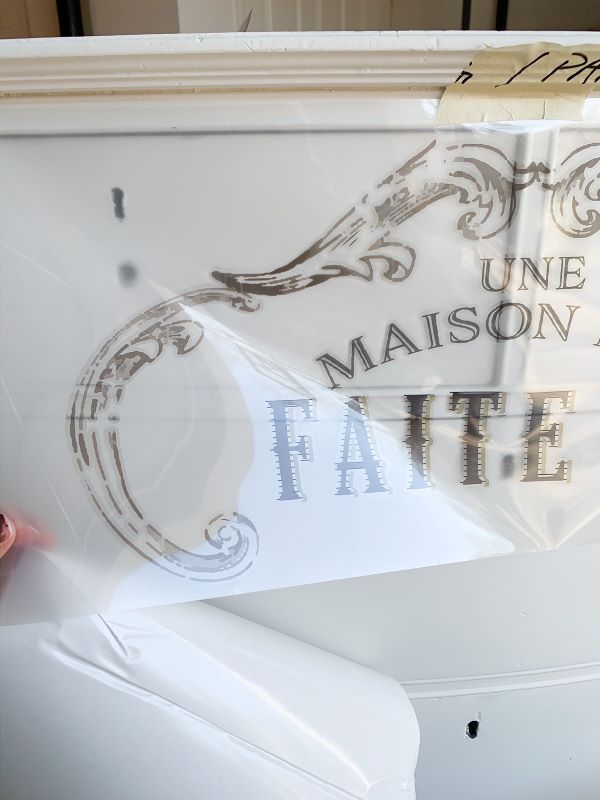
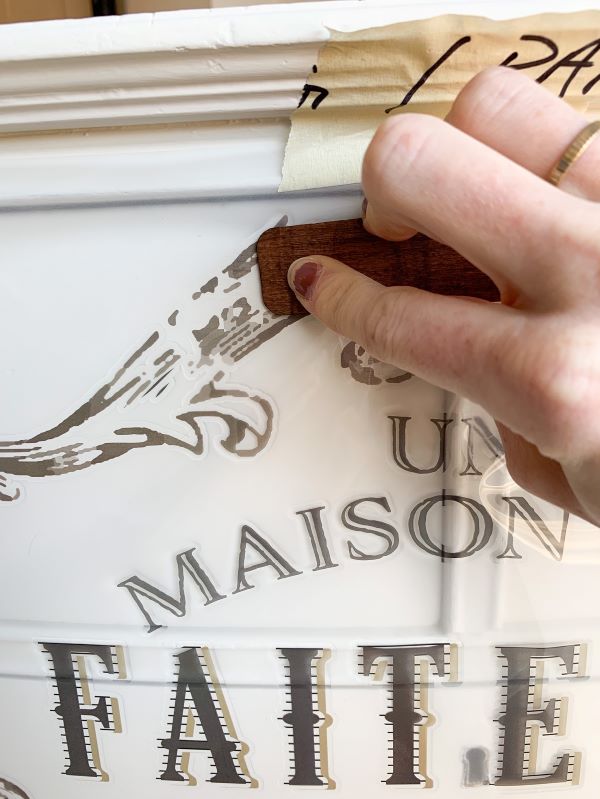
Step 6: Rub your transfer design onto the surface
Once the backing is removed, you can begin to rub your transfer design onto the surface of your piece. To do this, you will use the wooden transfer tool provided with your transfer. Start on the top and in the center of your piece, working down and out as you go.
TIP: When your transfer covers multiple drawers like mine, using a utility knife works great to reduce the gaps and allow for easier rubbing across the dresser framing.

You may need to use moderate force to get it completely transferred onto your piece. I noticed the design lightened through the acetate sheet as it began to fully release the transfer onto the piece.
This helped me see where I still needed to apply more pressure in areas that didn’t adhere yet. I could tell because these looked darker on the sheet. You can also check by lifting the acetate sheet slightly. If there are still pieces stuck on the sheet, lay it back down and continue to rub.
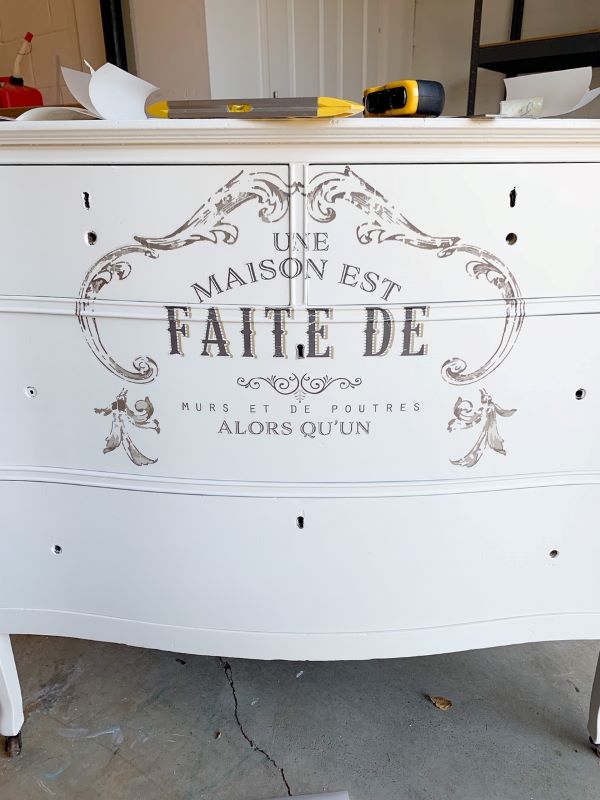
Step 7: Remove the acetate protector sheet
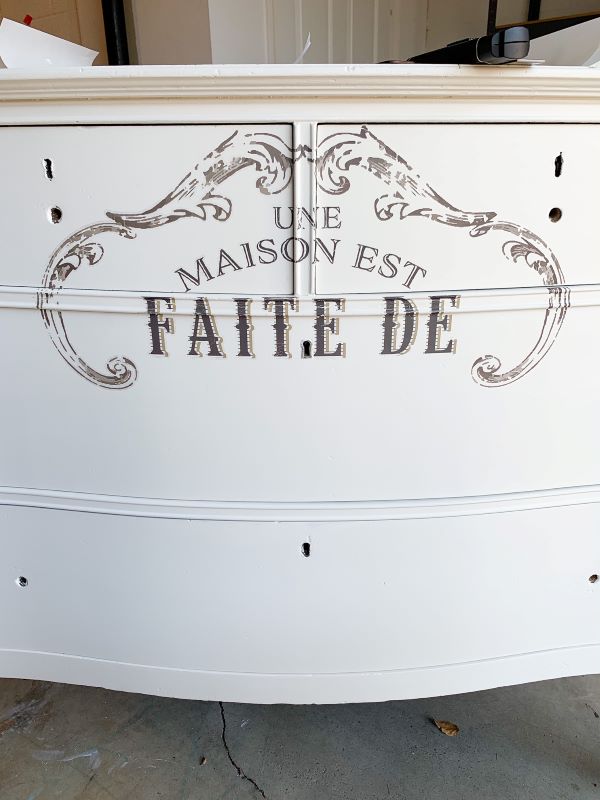
The big reveal! By removing the acetate protector sheet, you will see your transferred design now on your piece. Look over your transfer and make sure all pieces are fully stuck down.

I found a few edges on mine that I pressed down with my fingers. You can also use a clean, soft cloth to do this. Overall, I was super impressed with how well it transferred and adhered! I couldn’t wait to keep going!
Step 8: Repeat steps 4-7 as needed
If you are laying multiple transfers or have cut them down to different sizes, repeat the process for each piece. I liked doing it piece by piece because I felt like I had the most control this way. I also liked that I could layer them how I wanted by cutting certain elements away or the design down. Find what works for you!
Step 9: Seal your transfer
Once you have your transferred design fully adhered, you will apply your topcoat! (Ps. You can choose to distress your transfer and/or your piece before this step if you want!) I chose The Chippy Barn’s lavender-scented wax for my topcoat, and it applied over my transfer perfectly! It also smelled incredible – almost perfect in combination with the feminine feel of this dresser! I applied my wax with a lint-free rag and buffed the excess away to a stunningly, smooth finish!
Step 10: Add your final furniture touches!
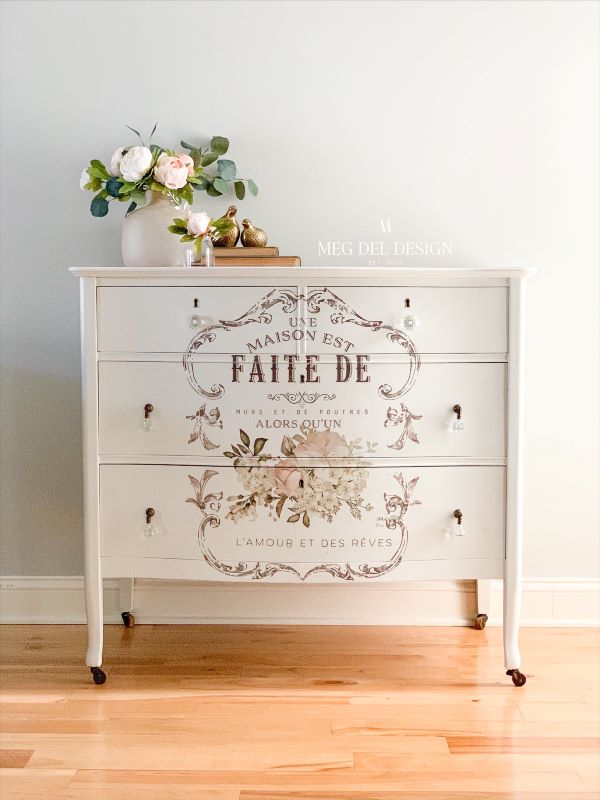
Dresser top:
After sanding down the entire top of my dresser, I was able to expose the amazing grain underneath! To accentuate this, I sealed it with The Chippy Barn’s Wood Nectar which is essentially beeswax and hemp oil. It seriously brought this top back to life! Like their wax, it is also scented incredibly, but this one in sweet orange! Talk about invigorating your senses!
{Ps. how amazing are those flowers on top? As soon as my friend Jen shared them on Instagram I had to scoop up a light pink and white bouquet. They were perfect for styling this piece! I just cut them down and added a little eucalyptus to make my own bouquet.}
Drawer side details:
I also cleaned up the sides of the drawers to reveal the beautiful age of this piece! Do you see those Knapp joints or pin-and-cove joints?! These were used between the 1870-1900s and give me all the feels! How amazing is it to realize the age and new-found beauty this piece now has!

Dresser hardware:
Lastly, I topped off this sweet, feminine piece with gorgeous glass drop pulls and knobs from Hobby Lobby. They felt elegant, yet effortless – the perfect jewelry for this Parisian-styled piece.
How to do a furniture transfer recap:
As a first-timer using a furniture transfer, I am so, so excited about the way this piece turned out! I was so pleased that my plan to use additional transfers went right out the window. The single transfer made such an impact. I loved it being the focal point of this dresser and felt like its sweet, feminine style was perfect standing alone!
I found the whole process of how to do a furniture transfer totally manageable, yet completely transformational! It makes me so excited to use more in the future!
Have you been scared to do a furniture transfer? I’d love to know what has held you back! Or, if you are a furniture-transfer pro what are some favorite tips you have or pieces you’ve completed!? Let me know in the comments! Excited to hear from you soon.
Thanks & happy refinishing!
Meg
Looking for more furniture tutorials?
If you want to learn more step-by-step processes to up your furniture game, then add these favorites to your list:
-Learn how to replace or reposition new hardware on your furniture!
-Learn how to prep your furniture for paint!
-Repair furniture using bondo filler
Want more furniture inspiration and refinishing tips? Subscribe to my newsletter and follow along on Facebook, Pinterest, and Instagram for the latest updates!
How to do a Furniture Transfer
Follow these steps to learn how to apply a transfer to a piece of furniture for an incredible makeover! Note: these steps may vary from piece to piece so adjust appropriately based on your project. Reference the blog post for detailed steps.
Materials
Instructions
- Prepare your piece for paint or the furniture transfer: Start by prepping your piece for paint. This will include cleaning and prep-sanding. Most importantly you want your piece to be clean and free of debris or dust before applying your transfer. You can reference my full tutorial on how to prepare your furniture for paint in this post for help in completing this step.
- Pick your color(s) and paint your piece of furniture: If you want to apply your transfer over wood, you can jump to step 4. If you want a painted base under your transfer, choose your paint color and paint your piece as you normally would. I love using my Zibra paintbrushes when I am painting by hand, but you can also choose to spray your piece.
- Let your painted piece dry: Allow your piece to dry according to the recommended dry times. This will let your piece cure before applying the furniture transfer. Wait 48 hours to 1 full week before applying the transfer.
- Position your furniture transfer: Use a few pieces of frog tape or masking tape to position your furniture transfer on your piece. It is helpful to use a tape measure and a level to get your transfer in the position you want, especially if you are trying to have it centered. Once you have it where you want, firmly press down the tape to keep the transfer in place.
- Remove your backing: Carefully remove the protective backing from the transfer, making sure your tape stays in place. By removing this layer you are exposing the sticky transfer to the piece.
- Rub your transfer design onto the surface: With the wooden tool provided with your transfer, begin to apply pressure over the top layer of acetate paper. Use consistent force and continue to rub the transfer until it begins to fully adhere to your surface. You may need to lift the acetate paper from the transfer to check your progress. If some of the design is still attached to the paper, continue rubbing the transfer.
- Remove the acetate protector sheet: Once you have your full design transferred onto your piece, peel back the acetate protector sheet to reveal the transferred image! You may need to press a few small areas down with your fingers or a clean rag.
- Repeat steps 4-7 as needed: If your transfer is broken down into pieces, you will follow these same steps for the remaining pieces.
- Seal your transfer: Using a water-based poly or a wax, seal your piece and furniture transfer.
- Add your finishing touches: Add your hardware back onto your piece and any additional features you want to add! Your furniture transfer piece is now complete!
Notes
The process of how to do a furniture transfer may vary slightly depending on the finish you are trying to achieve. Assess your transfer and finish desired and adjust your process as needed.