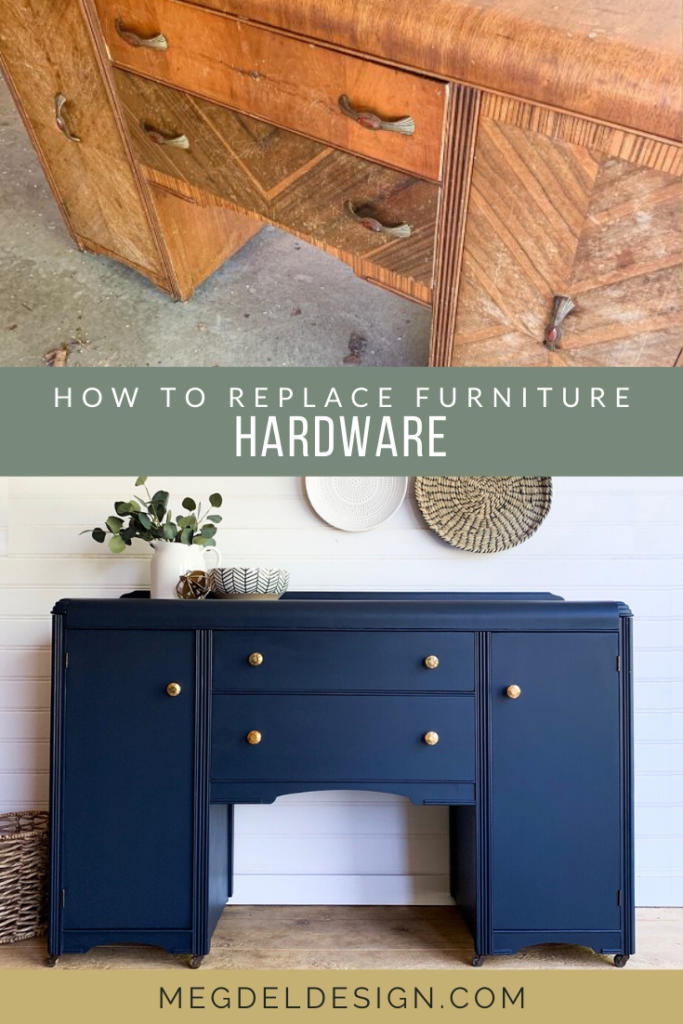
Did you just score an awesome piece you want to refinish with a vision of new hardware!? Learning how to replace furniture hardware when refinishing a piece can be totally transformational!
This guide is all about HOW to replace furniture hardware and will walk you through the steps to take if you are moving, repositioning, removing, or adding new hardware to a furniture piece. Specifically, it will help you change or move hardware on your furniture when you aren’t trading out like-hardware. Let’s dive in!
When do you replace furniture hardware?
There are a handful of situations when changing or adding new hardware may fall on your to-do list! Some of these reasons are outlined below:
To modernize older pieces:
The piece has very old hardware and you want to modernize the look.
To update or alter the style of the piece:
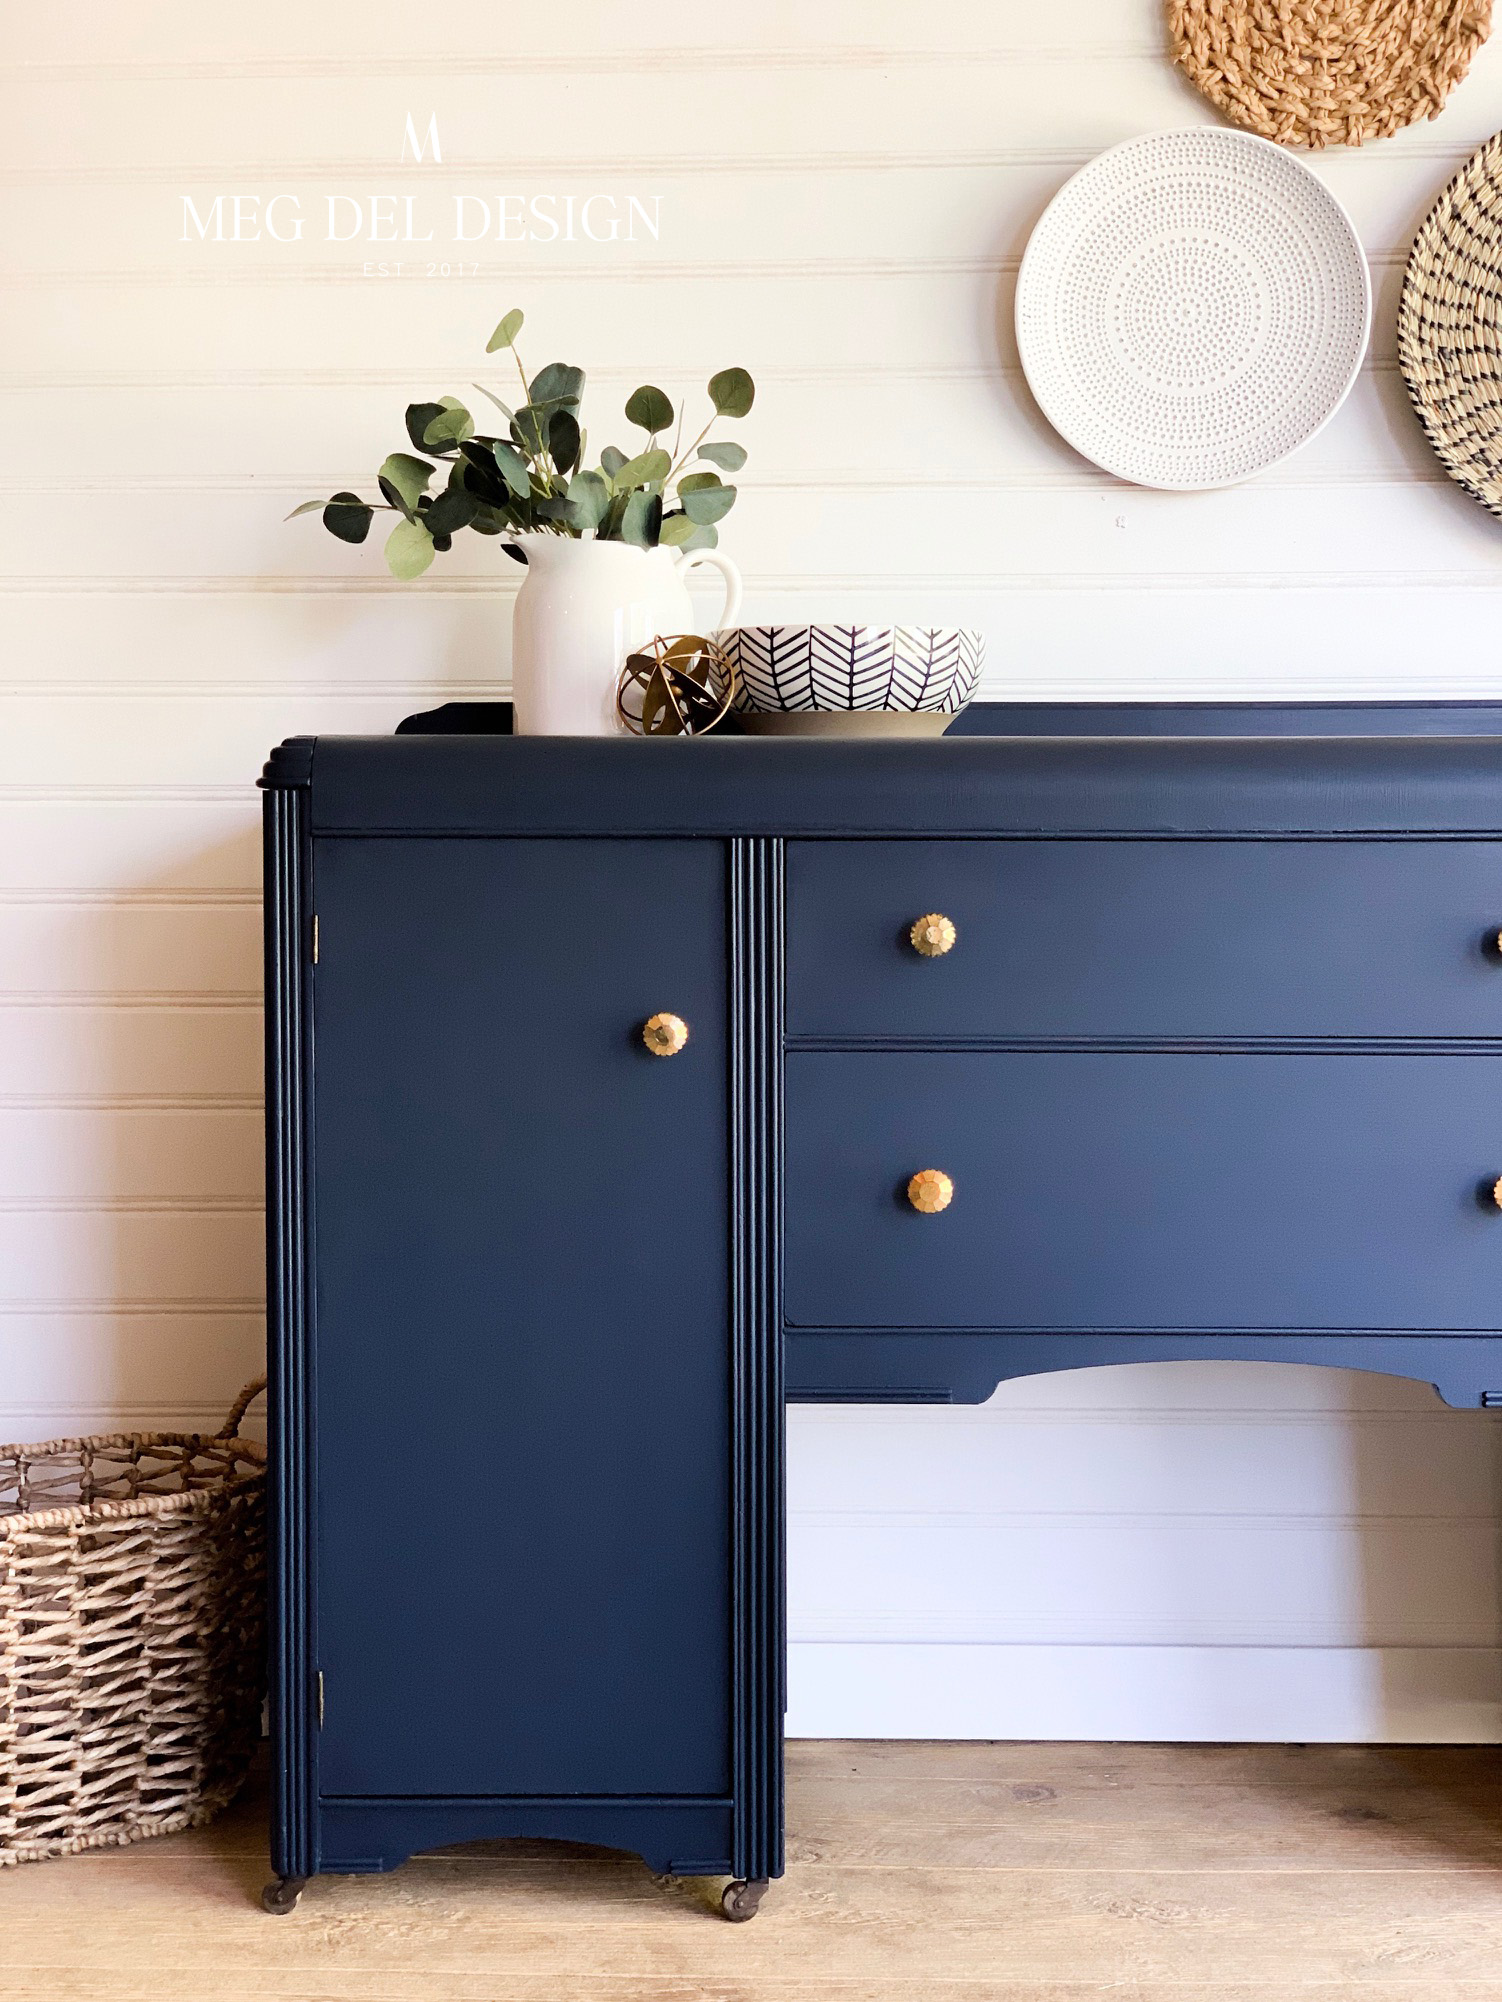
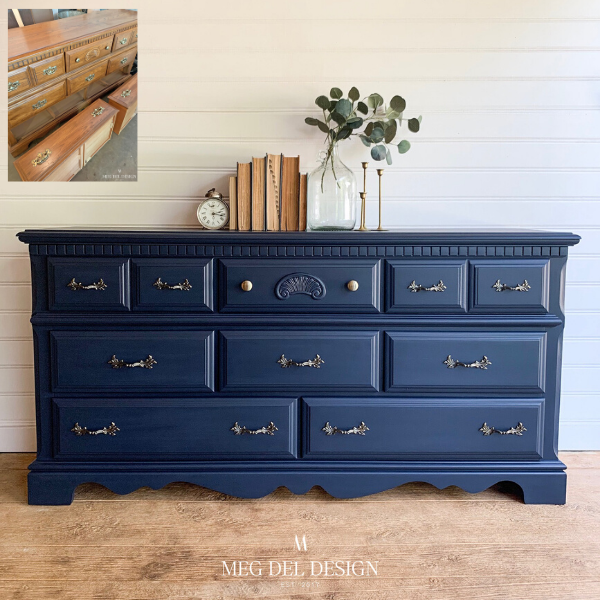
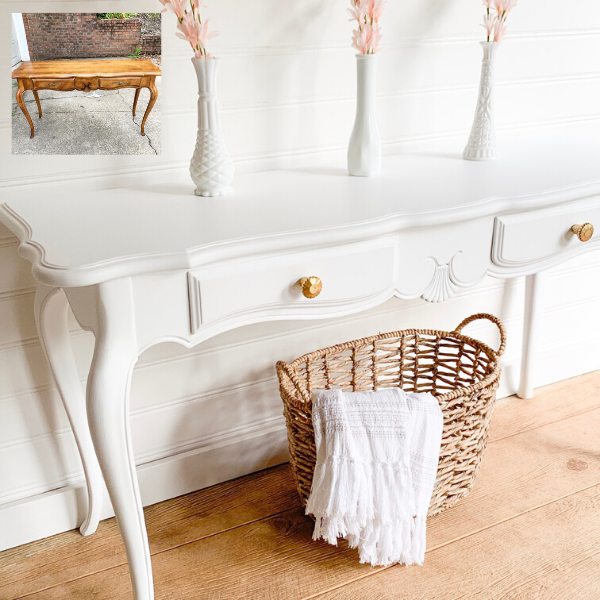
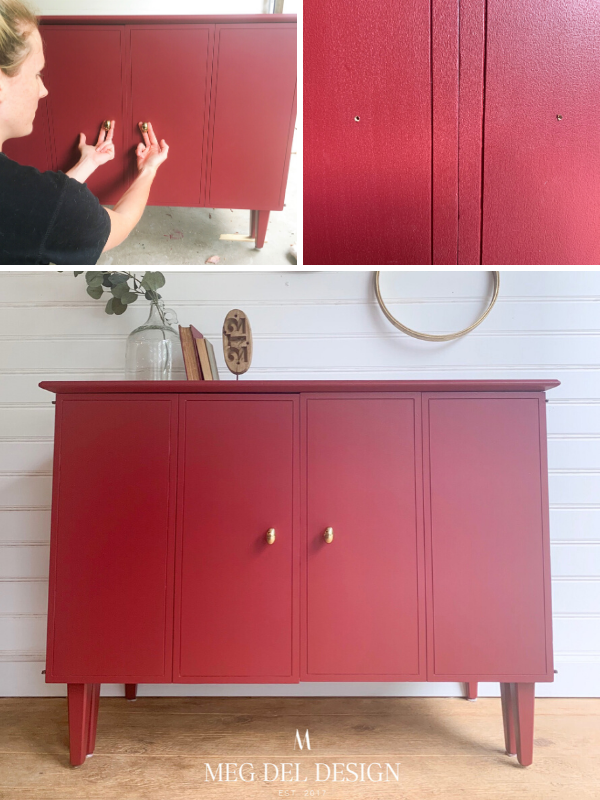
You may want to alter the style of the piece. For example, you can add French provincial handles to a traditional style dresser to give it an elegant/Parisian style. This changing table is an example of this and you can get the look with this guide.
(Brass hardware from D. Lawless Hardware)
Crooked or uncentered hardware:
Not every furniture manufacturer is created equally. You might get pieces previously refinished by someone who didn’t do the best job. If you have crooked or wonky hardware on your piece, you will need to fix this.
From handles to knobs OR knobs to handles:
You might decide to make this switch if it makes more sense for the function of the piece. Or, simply because it is more visually appealing.
(Gold knobs from Hobby Lobby)
Missing hardware:
It is super common to get pieces that are missing one or multiple hardware pieces. This will require you to source replacements or change them completely.
No hardware:
Not just missing one or two, but the whole kit and kaboodle means you have some replacement work to do. Time to envision what hardware is speaking to you!
Decorative feature:
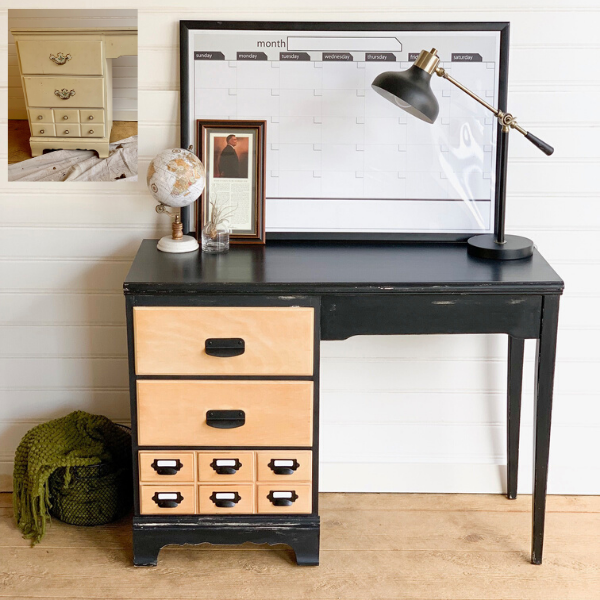
I love to think of hardware as the jewelry of a piece! You can use hardware to create a total design feature that really has no function but sets the piece apart. A favorite example of this is card-catalog pulls on a piece! They provide a ton of interest, without a lot of added function. You can check out the before and process I took for this modern farmhouse desk.
(Large pulls from Magnolia. Small card catalog pulls from D.Lawless Hardware)
These are just a handful of reasons you might need to reposition or replace furniture hardware. At the end of the day, the decision is completely yours. Do it for function, or 100% decoration! Keep reading for your next steps on how to replace furniture hardware.
As an Amazon Associate, I earn from qualifying purchases. This post contains affiliate links.
Where do you get new furniture hardware from?
I have a few favorite hardware companies I tend to shop at!
D.Lawless Hardware:
They have a phenomenal hardware selection of all different eras, styles, sizes, and colors at an exceptional price. You can order from them online at https://www.dlawlesshardware.com/ The shipping is always quick and Derrick (the owner) is seriously so easy to work! If you have questions or are having trouble finding what you are looking for he is super helpful. He will make suggestions and let you know if they are sourcing new handles or pulls that might be what you are needing. Talk about amazing service! – USE MEGDEL for 10% off your hardware order!
Shackteau Interiors:
I love Kristen’s selection of hardware, especially her drop pulls! She carries them in multiple colors and finishes! This makes it super easy to find an option that will look stunning on your piece. Her shipping is always fast too! I love her milk-paint line so much; it is no wonder her hardware selection is amazing too!
Hobby Lobby:
Sometimes the convenience to pop into Hobby Lobby is awesome. I like that I can check out multiple options at once, especially under a time crunch. I can touch and feel them, see the sizing, and colors first hand which is great. They have a big selection and every other week they are 50% off – score!
How to Replace Furniture Hardware Steps:
Step 1: Remove old hardware
To replace furniture hardware you will first need to remove the old hardware by using a screwdriver. I recommend using a drill like this Ryobi drill to cut down on time. I love that mine is battery operated, so I don’t have to worry about dragging around a cord.
When I have stubborn old screws, this is my favorite hand-held screwdriver. I love that it has the oscillator and all the bits right within the bottom. I am notorious for losing my screwdriver bits (just ask my husband), so the storage helps keep me in check.
This screwdriver is also a great little tool for pieces with tight spaces or screws to remove.
Why keep old furniture hardware?
Make sure to put the old furniture hardware, including screws, into a baggie if you plan to keep them for another project. This will help ensure you don’t lose any! (A tip I have learned after many hardware searches for that last knob or screw).
Keeping old hardware can also come in handy for another project that might be unique. For example, if you have a client that LOVES the original hardware on a furniture piece but you are missing one knob, you might just have one that matches from an old piece. Or, you might be able to swap a few out with a like-style you have in your stash.
Warning: this can lead to hoarding-like hardware stashes. I love keeping any hardware I anticipate using somewhere down the road! Worse case – you can do a hardware purge with your spring cleaning if it becomes a real problem. (Can you tell I am considering this for myself?!)
Step 2: Decide on your new hardware
After you’ve removed the old hardware from your piece, it’s time to think about what hardware you’ll replace it with. Just like picking a paint color for your furniture piece, this decision can be tough to make. To help decide on new hardware, here are some things to ask yourself.
Questions to consider when choosing new hardware:
What style is the piece of furniture? Do you want the hardware to match this style? Do you want to give the piece a more modern feel with something new? Are knobs or handles best for the piece? Would adding hardware to a new area bring balance or a fun design feature to the piece? Are some of the existing hardware locations unnecessary?
Asking these questions can help you decide on the general direction of the new hardware you’ll choose for your piece. Sometimes searching hardware online can give you the inspiration you need too!
Why should you brainstorm about the new furniture hardware you want?
This is important because it will help determine your next steps to replace furniture hardware. You might have a hard time choosing, and that is ok! BUT, it does help to have a general idea of what you want so you don’t have to repeat steps.
For example, if you know you want to update the old handles to modern knobs, you don’t have to have the exact knobs picked out at this point. However, you will be able to move onto your next step in tandem with your prep work BEFORE you paint. In this example, you would proceed to step 3 listed below.
What if you can’t decide on new hardware before or change your mind after you paint?
If you truly can’t decide on your hardware before you paint, or don’t like the option you chose, don’t worry. Sometimes you need the painted finish to inspire the final decision for hardware.
This just means you may have to do some fill, sanding, and repaint the area to accommodate your hardware choice. The critical thing is that you sand and smooth it down very well for a cohesive painted finish. (Check out Step 4 for more details on this.)
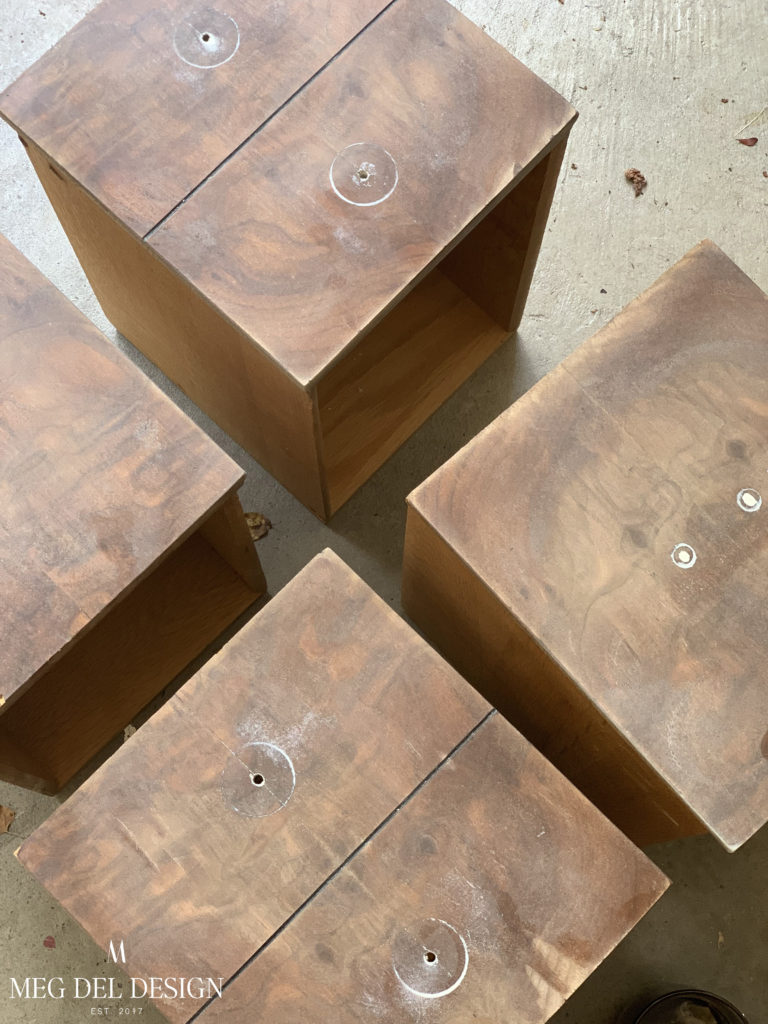
Step 3: Fill old hardware holes
When you choose new hardware that is different sizing or positioning from the original hardware holes, you will need to fill the old holes you will no longer need.
How do you fill old hardware holes?
I recommend using bondo filler for this. Bondo is my favorite product to use for filling old hardware holes and my go-to for furniture repairs as well! I love it because it doesn’t shrink like common wood fillers, it dries quickly, and very hard. You can sand it down 15-30 minutes after the fill is applied. This is amazing for keeping you efficient and your project on track.
I have a full bondo guide outlining how to mix and apply it for an effective fill. You can reference the step-by-step guide to complete this step. While filling old hardware holes, it’s also a great time to complete any furniture repairs on your piece. This way you only have to mix and apply filler (ideally) one time. If you have a lot to fill you might have to mix a few batches. But, you get the point – one fill step.
Other fillers:
There are a ton of other fillers that also work well to complete this step in how to replace furniture hardware! Some include Elmer’s wood filler, kwik wood, etc. You can even cut down dowels and fill around those too. You might have a personal preference or use what you have on hand.
Hardware hole filler tips:
1. Don’t forget to fill in areas that have been indented from hardware plates etc. from the old hardware. These will be visible when you paint if you do not fill them. 2. Make sure to choose a stainable filler if you plan to stain the drawers or areas you are filling.
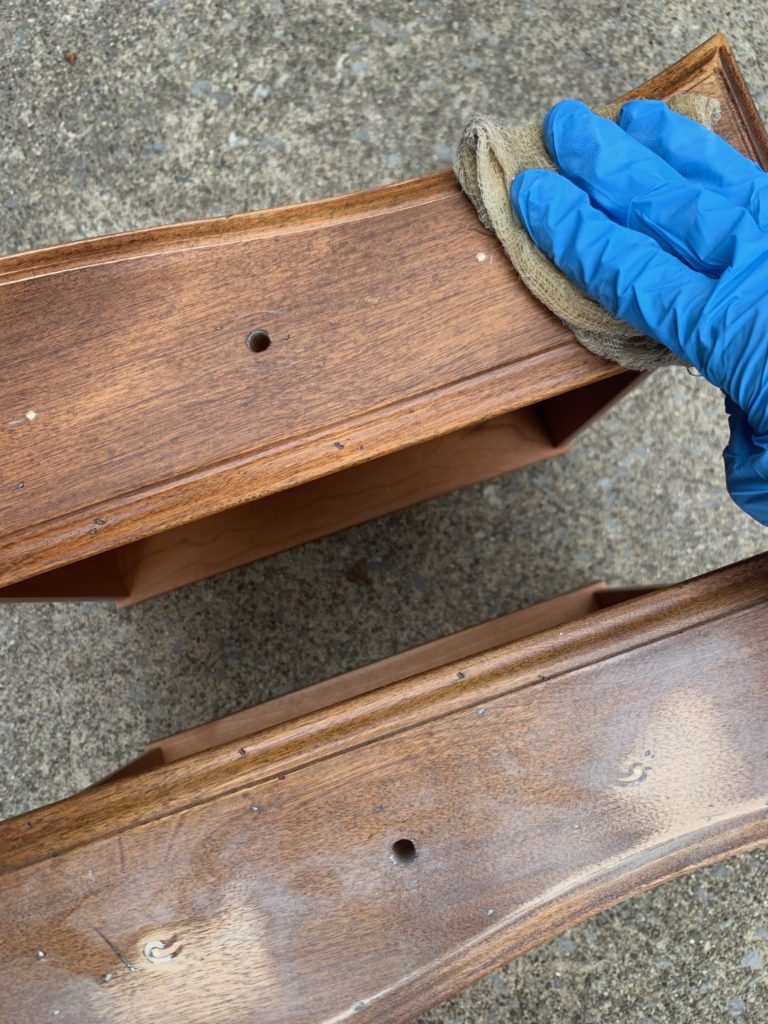
Step 4: Sand down your fill to prepare for paint
Regardless of what filler you decide on, sanding your filler down appropriately is critical for your painted finish.
Why is sanding your fill to replace furniture hardware so important?
You want to make sure you sand the filler down so it is super smooth and without any raised areas. This is key so it doesn’t show through in your final, painted finish.
How to sand down your fill for a smooth finish:
I recommend following my bondo process and using 220-grit sandpaper and an orbital sander to smooth out the fill. By sanding down the fill, you may also sand down some of the surrounding finish on the piece. That is normal!
Use a tack cloth to remove the sanding dust. Next, rub your fingers over the area to check for any raised spots, bumps, etc. If you feel these, continue sanding until your fill is flush to the main surface. Otherwise, you will see this variation when you begin to paint. If you notice an area that didn’t get completely filled, you will need to apply a second coat of filler. Then, repeat step 4.
During this sanding step, it makes sense to also prep sand your piece for paint. See what I am doing here? Trying to maximize your time and efficiency in your process so you aren’t having to jump back and forth. You are sanding in this step, so let’s continue sanding!
I have a comprehensive guide on how to prepare furniture for paint you can reference for prep sanding and how to complete this step! (It really is one of the most critical steps in preparing your piece for paint – don’t skip it!)
Step 5: Shellac or prime where you filled old holes
Remember how I mentioned you may sand down some of the original finish when sanding down your fill? This can lead to some funky variations in the color and finish on your piece. Honestly, it can look a little scary BUT don’t worry.
As long as you have a smooth surface from your hardware fill to the remaining area on your piece, you’ll be in great shape after this step. This step is using Shellac or priming your furniture piece to cover where you filled the old holes.
What is Shellac and why do you use it on filled hardware holes?
Shellac helps lock in tannin bleed-through or discoloration that migrates through the wood once you apply paint. Because of the variation from sanding and materials (ie. wood, filler, etc.) Shellac will also help provide one even surface for your paint to be applied over. Apply 1-2 coats of Shellac over the whole drawer. You can use the spray version or a foam brush to apply the can version.
Do I have to use a primer to cover where I filled holes too?
You don’t have to use both Shellac and a primer. Either is a great option to give you the even surface and absorption for a smooth finish. My favorite primer is BIN by Zinsser and actually has Shellac built right in. So, I guess in a sense I use both. However, it helps guarantee no bleed-through and an even application of paint!
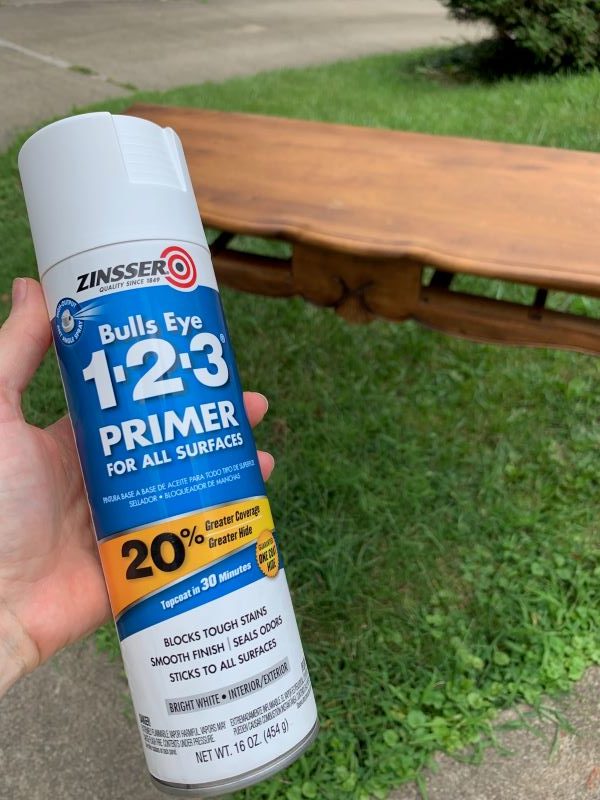
Other primers like Bulls Eye 1-2-3 primer, Stain Blocker, or a standard primer can be used also. With Shellac or a primer, make sure to sand down after each application with a fine-grit sandpaper in between coats. This will help smooth out any rough areas before painting.
Halfway there!
The first five steps might seem like a lot, but think about how far you are in your refinishing process. You are getting to the fun stuff soon!
Step 6: Measure and mark your new hardware position
This step in the process to replace furniture hardware is where it becomes important to finalize your new hardware decision. It’s also important to make sure to be focused and really take your time.
Heard the saying measure twice, cut once? Well, my motto to replace furniture hardware is basically measure 4 times, drill once. I have rushed this step before and drilled incorrectly – meaning I had to refill holes multiple times. Not fun. So, instead, I highly recommend measuring a few times to ensure your placement is accurate before you drill.
How do you choose the new placement of your hardware?
First, you need to decide where you want your hardware to sit on the piece. Often, I like to play around with the spacing while I have the drawers on the ground facing up. This way I can easily move and visualize the hardware placement. Sometimes I will keep the drawers on the piece and hold the new hardware up to different spots. Find what works for you.
Once you find where you want the hardware positioned, take a pencil and make a mark at this spot. For knobs, I will make a mark where the center of the knob roughly was. For handles, I will mark the general height and width I want them at. Next comes the precise measuring.
How do you measure and mark holes for your new hardware?
Measuring knob hardware holes:
You will position the knobs on your drawer fronts and make a note of how far from the top edge of the drawer and the side of the drawer you want it placed.
After this, simply measure your distance down and in and make a small x at this point. Repeat this measurement on the other side if applicable, and double-check the distances match on each knob.
Measuring handle hardware holes:
The spacing of your hardware holes will determine how you measure. For example, if you have handles that have a 3” center-to-center width, with a ½” of additional material on either side (4″ total handle width) you will want to measure appropriately.
In this example, you would find the outside spot you marked, and make another mark ½” in. This is where the first hardware hole on the handle is. Next, measure 3” from this hole and make a mark. Now you have the second hole for your handle. It doesn’t hurt to double-check your measuring to confirm the center-to-center width is at 3″ exactly.
After this, measure down from your vertical mark to ensure the two width holes are the same distance down or use a level to confirm. Measure and remark as needed – these will be your final marks. Erase the first general marks you made.
What measuring tools can you use to measure new hardware holes?
There are some pretty spiffy tools out there to help you get a consistent hardware placement every time. I don’t have one of these (yet), but I have some refinisher friends who swear by it. It is a Kreg Jig cabinet hardware jig that lets you set your hardware spacing. Then, you clamp it to your drawer fronts for an accurate placement each time.

You might also consider making your own template that outlines the exact width/hole placement you need. I’ve done this with think cardboard and it has worked just fine.
IMPORTANT: Things to keep in mind when measuring new hardware holes:
Not all hardware holes measure the same – beware! You may need to measure each handle to make sure the widths are exactly the same. If one is off by an 1/8″, so will your holes.
Some drawers may not line up evenly on your piece, so you may need to fix/maneuver them before you measure to replace furniture hardware. If you cannot get the drawers aligned, you may want to adjust your hardware position accordingly.
The same goes for drawers that may be different sizes. You may need to measure differently to accommodate this so all of your hardware is still aligned on the piece.
Take your time while measuring and double-check your measurements & placement.
Step 7: Drill your new hardware holes
After you have your new hardware holes marked, it is time to drill the holes! Before you jump right in, I recommend using a small drill bit to get the holes started. Then, follow up with a bit that’s the size or just larger than the hardware screw you’ll be using. This will let your screws go through while avoiding a hole so big your hardware doesn’t screw in tightly.
Sometimes I will put painters’ tape on the backside of the drawers before drilling. This isn’t a necessity but can reduce splitting the wood inside as the drill bit goes through. If you have splitting or rough areas, just take a little sandpaper to smooth these out.
Step 8: Check positioning & make sure your hardware fits
The moment of truth! Once you have your holes all drilled, it is time to check your positioning and make sure the hardware fits. I recommend doing this after the first drawer before tackling the remaining ones. You can confirm you like the positioning, and if you need to make a change, it is less work overall.
Step 9: Paint and finish your furniture piece
Once you have the new holes drilled and the hardware fits, you are at the FUN part! Remove the new hardware from the piece and get to painting!
Paint your piece as you normally would, whether that is by hand or using a sprayer. (Find my favorites of each applicator in my Refinisher’s Gift Guide!) After the first coat, I recommend checking how your fill areas look. Check whether you need extra fill over areas missed or additional sanding. If all looks good, finish painting and seal your piece!
Step 10: Install new hardware
The (almost) final step! It is finally time to put the jewelry back on your piece. Install your new hardware into your new holes and witness your awesome furniture transformation!
Because we predrilled, you might have a little paint/topcoat in your holes. You can push this out when you screw your hardware in. I will typically use my Ryobi drill for this step.

(Knobs from Hobby Lobby)
Step 11: Mark and cut down excess screw length
FYI: This step might not always be needed. However, if you install your new hardware and your screws are wayyy too long, this step is for you! Don’t leave them super long. They can poke you or your client’s hands when you reach for something in the drawers.
Instead, measure how much excess you need to remove from your screw and make a mark. Take a multitool/wire cutter (like this one) and insert the screw into the side that says insert on this side. Once you get to your mark squeeze the multitool to break the screw at that point.
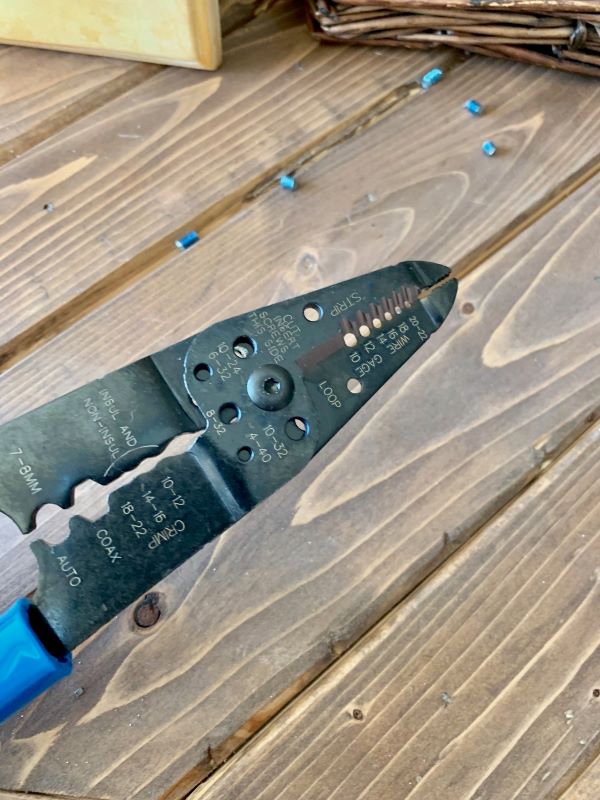
PSA: make sure to be wearing eye protection like these glasses when doing this!! You will have little screw bits a-flying!
Once cut down, your hardware is officially ready to be installed and voila! You, my friend, have a completely finished piece with gorgeous new hardware!
How to replace furniture hardware recap:
Learning how to replace furniture hardware will become so second nature to you once you get into it! You will realize how transformational new hardware can be in updating a piece of furniture. It can become one of the most fun parts of your furniture design.
I hope this guide gives you the confidence to change it up, fill the holes you need to, measure accurately, and drill new holes so that you love the hardware on every piece you refinish!
Find what works for you to replace furniture hardware!
Just remember, these steps are just a guideline! This is how I generally like to reposition and replace furniture hardware on my painted furniture pieces. Each project is different and you might find a different order of these steps works better for you. THAT IS OK! Bottom line: use what you find helpful in this process, and make it work for you!
Lastly, I’d love to know… Do you have a favorite type of hardware you can’t get enough of?! Any tips you love for replacing furniture hardware or questions for me? Leave a comment and let me know!
Thanks & happy refinishing!
Meg

Looking for more furniture tutorials?
If you want to learn more step-by-step processes to up your furniture game, then add these favorites to your list:
-Learn how to prep your furniture for paint!
-Repair furniture using bondo filler
-Learn how to dry brush furniture
Want more furniture inspiration and refinishing tips? Subscribe to my newsletter and follow along on Facebook, Pinterest, and Instagram for the latest updates!
How to Replace Furniture Hardware
Learn how to replace furniture hardware easily! This guide teaches you how to remove, fill old hardware holes, measure, and drill new hardware holes for a gorgeous transformation.
Materials
- -Bondo or favorite filler
- -180-220 grit sandpaper
- -Tack cloth
- -Shellac or primer
- -New hardware
Tools
- -Screwdriver or drill
- -Filler tool like bondo spreader
- -Orbital sander
- -Measuring tape or ruler
- -Pencil
- -Drill bits
- -Multi-tool/Wire Cuttter
Instructions
- Remove old hardware: Use a screwdriver or drill to remove old hardware from the piece. Optional: place hardware and screws into a baggie to save for a later project.
- Decide on new hardware: brainstorm what you want for new hardware by asking yourself questions about what you want your piece to look like! Research hardware options for inspiration (My favorites are D. Lawless Hardware, Shackteau Interiors, and Hobby Lobby)
- Fill old hardware holes: use your favorite filler like bondo, or wood filler, or kwik wood to fill the extra hardware holes you will no longer need. Fill other areas on your piece that require repairs at this time.
- Sand down your fill to prepare for paint: use 180-220 grit sandpaper and an orbital sander to sand your fill flush for a smooth and even surface. Continue to prep sand your piece for paint.
- Shellac or prime your fill areas: use shellac or a primer like BIN to cover the areas where you applied filler and sanded. This will help ensure an even application of paint over the areas with variability. It will also help prevent wood tannin bleed-through.
- Measure and mark new hardware location: find the placement you like for the new hardware and make a general mark at this point. Measure your vertical and horizontal distance from your drawer edges for a precise location. For knobs, make an x at this point. For handles, measure and mark the exact spot for the center-to-center width of your hardware. Repeat this measuring and marking step for additional hardware on the same drawer and double-check each match! Repeat for additional drawers etc.
- Drill your new holes: use a small drill bit and drill pilot holes at your marks. Size up to a drill bit that is a similar size to your screw or just larger and drill. Optional: use painters tape on the inside of the drawers prior to drilling to limit wood splitting.
- Check your positioning and make sure the hardware fits: apply your new hardware to make sure you like the placement and make sure the hardware fits. If so, continue drilling all of the remaining hardware holes!
- Paint and finish your piece: follow your favorite painting and finishing process - you are almost there!
- Install new hardware: install the finishing touches and hardware on your piece! Use a drill or screwdriver for this step.
- Cut down excess screw length: (Optional). This step won't always be needed but when your screws are too long, use a multi-tool or wire cutter to shorten the screws down to an appropriate length.
- ENJOY YOUR PIECE & NEW HARDWARE!
Notes
- Make sure to fill holes completely.
- Use a stainable fill option if you plan to stain the drawers.
- Make sure to measure the center-to-center width on each handle to ensure they are all the same size.
- Take your time and measure at least twice before drilling.